Pages

Sunday, August 29, 2010

David's Fingerless Gloves

I bought another ball of this lima alpaca wool from Lincraft when it was on special to make another pair of fingerless gloves for David, this time I made up my own pattern to fit.

David has been wearing the first pair of fingerless gloves I made, but they are a little small for him, being too short and tight to pull on. It's his birthday today, so I just had to make him another pair in matching wool, this time longer and wider. And just in time for winter to be nearly over, too! At least he'll have them to wear all next winter! This longer pair of fingerless gloves weighs over 60g so took more then 1 x 50g ball of alpaca, and I used a 4mm hook.

My pattern for David's fingerless gloves
1. ch 36, sl st to join and form a circle, taking care not to twist the chain, ch 2, treble (US dc) in 1st ch on the right of ch 2 to form a 'cross-stitch', (sk 1 ch, tr in next ch, tr in sk ch) repeat to end, sl st in top of 1st cross-stitch (18 crosses)
2. sl st into next space, ch 2, treble in top of 1st cross-stitch (sk top of next cross, treble in next space, treble in top of sk cross) repeat to end, sl st in top of 1st cross (18 cross-stitches)
3-13. repeat row 2 until there are 13 rows of cross stitches
14. ch 2, treble in top of cross to the right of ch, ch 10 (thumb hole), sk 2 cross-stitch, sl st in between 2nd and 3rd cross, sl st 2 up the ch, treble in top of 2nd cross, sk top of 3rd cross, treble, treble in top of sk cross, repeat until end, sl st in top of 1st cross (17 cross-stitches)
15. ch 2, treble in top of cross to the right of ch, sl st in thumb hole, 4 dc (US sc) in thumb hole, treble in between next 2 crosses, treble in top of cross to the right to create cross, repeat cross-stitch pattern to end, sl st in top of 1st cross (16 cross-stitches)
16. sl st 1, ch 2, treble in top of cross to the right of ch, sk 1 dc, sl st in next 2 dc, sk 1 dc, treble in between next 2 crosses, treble in top of the 1st of those 2 crosses, sl st in top of 1st cross (16 crosses)
17. sk 1, sl st1, sk 1, sl st 1, sl st 1, ch 2, treble in top of 1st cross left of thumb hole, repeat cross-stitches to end, last one goes in sl st over thumb hole, sl st in top of 1st cross (16 crosses)
18. sl st, ch 2, treble in top of cross (sk 1, treble, treble in sk) repeat to end (16 cross-stitches)
19, 20, 21. repeat row 18

For David's birthday, I also bought him a father-to-be book with a cute lovey-dovey book mark to go with it. He's being such a trooper and so supportive of me right now, I wanted to get him something to help him from a father's point of view. This particular book comes recommended and it made him laugh in the book store when he saw it, so I got it for him. And it's good timing too, Father's Day is a week after his birthday!

Also for David's birthday, we got him an electric mixer! It might not sound like a good present, but it certainly isn't for me as I won't be baking! David loves to bake and is very good at it, so a proper machine will make it even more fun for him! If you would like to see some of the things David likes to cook, be sure to check out his cooking blog @ Teenas-home-cooking.blogspot.com

Happy Birthday, my darling David <3 <3 <3

Saturday, August 28, 2010

Purple Fluffy-top Baby Socks

These are the same as my green fluffy-top socks, except I altered the pattern slightly so the seam is at the sole instead of the top of the sock where it can be seen.

Using the purple big baby wool I got from Lincraft when it was on special, making these cute baby socks were a lot of fun. I changed the heel so I started the rounds in the centre of the heel at the sole instead of the centre of the front. There are only 7 rows that are turned around, the rest of the pattern is the same as before. I used a different fluffy top for these ones, this is some flutter wool with flecks of yellow, pink and purple.

There are two variations of ankles in the pattern, for this one I used the cluster. I thought I had memorised this cluster pattern  and was AFK in front of the TV when I did the first purple sock and I totally screwed it up! After I did the second sock (after re-reading the pattern) I realised my mistake and undid the first ankle and did it again. I'm glad I did, now the two purple socks actually match ...

Now I have some more cute things to add to my growing pile of baby stuff!!
<3 <3

Monday, August 23, 2010

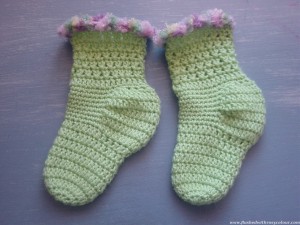
Green Fluffy-top Baby Socks

I found this pattern for baby socks, and they turned out so cute I've memorised the pattern so I can make more!

The pattern for these baby socks is at free-crochet.com, all you have to do is register at the website to login and you can download free patterns. So far, I haven't received any spam and I haven't paid anything. For these kinds of things I just give an incomplete mailing address, just in case. The pattern for the socks is in the 'For baby' section. For these ones, I used 4ply baby wool with a 3mm hook.

One thing I think could be better about this pattern is the start of each round should be on the sole of the foot, not the top. For my second pair of socks, I'm going to turn the heel around so the rounds start underneath, not on top. That way you won't see the seam.

Other than that, this is a worthwhile pattern for me to memorise I am thinking! It took me about a couple of hours to make the pair. I topped them off with an extra row of dc (US sc) in a cheap fluffy craft wool, so I think they look extra cute!

Sunday, August 22, 2010

Green Hexagon Baby Jacket

I'm quite pleased and surprised this one turned out so cute!

I used some green craft wool my mum gave me for my birthday, I've got quite a lot of that colour left. The darker green was a small amount I have in my scraps bag, as was the white. I'm not sure if that dark green is real wool so I'll have to wash this one carefully, which might turn out to be too inconvenient later on. But this jacket was a bit of a 'practice' item for me to try, recycling some old buttons that I think look really cute, so making this jacket turned out to very thrifty and frugal indeed!

I used the hexagon jacket idea which I've tried before. I've since found another blog that explains the hexagon jacket pattern in more detail, I did the bottom edging and collar following that blog's pattern. The 11 rounds of green used 60g from my 100g ball of craft wool.

Even if this jacket doesn't fit my baby, it will be cute for a toy teddy to wear!
<3 <3

Green and Orange Baby Beanie and Booties

We're still 4 weeks away from finding out the gender of our baby, so I'm really leaning towards baby things in neutral colours.  I just received a lovely random package from my sister-in-law which had some very, very cute baby jumpsuits, all in neutral colours like lemon and green, or silver stars, which is just gorgeous. I'm rather leaning towards these coloured clothes for baby anyway. I really don't agree that the very young should be shoved in a labelled box so early in their lives. Too many baby clothes are overly pink and flowery or blue and macho in my opinion, there is no way I will be wanting to dress a baby boy in army greens, or black with a skull and cross bones print! I'm almost tempted to dress a boy in pink flowers just to get a reaction out of my father, it could be very funny to watch him freak out!

I still have some baby wool left in this nice variated orange and green, so decided to do another pair of booties. I then made a beanie to match using the same pattern as my purple and white baby beanie.

The booties are very similar to my purple and white baby booties, which are based on a pattern you can watch on youtube by Theshyrainbow. I added my own cuffs which are not in the video.

When I am using just one colour, I don't like to cut the wool, fasten off, and start somewhere else, so I have altered the pattern slightly so I can keep it all in one piece. By changing rounds 6, 7, 8 and 9  so that the start of every round is at the toe instead of the heel, there is no need to fasten off in the middle of the bootie.

One colour, One piece variation
1-5. as per youtube video by Theshyrainbow.
6. ch 3, tr 1 in same, (tr decrease every 2) 3x, tr 32, (tr decrease every 2) 3x, tr 2, sl st
7. sl st 8, ch 1, turn, htr 16, turn
8. ch 2, sk 1, treble don’t pull through leave loop on hook * , sk 1, trebel *, sk 1, treble *, etc to end, you should have 9 loops on hook, pull through
9. dc in space just left of centre, dc 2 in next sp, decrease dc over 3 in corner, dc 22, decrease dc over 3 in corner, dc 2 in next sp, dc in space just right of centre
My cuff variation
10. ch 3, tr in dc left of centre, this will create a little gap at the front, cont. with the rest of the cuff, which basically 6 rounds of trebles, and a 7th row of htr or dc.
11. ch 3, 1st treble in next space, then trebles around ...

Friday, August 20, 2010

Two Pairs of Purple Baby Booties

I've been having real trouble finding a bootie pattern that is quick and easy, I even tried to make up my own pattern! The difference with making slippers for dolls and teddy bears is that I have them to model and make sure they fit. But for the baby booties, my intented recipient is ... currently busy growing inside my tummy! We did get to see the baby's feet, complete with tiny toes, on our ultrasound at 13 weeks though. Isn't it amazing how formed the baby is after only 3 months?

After trying several different types of bootie patterns, I found this one which looked simple enough. I hope I don't get to actually use these premmie booties, that my baby arrives strong and healthy. But these premmie booties were really fun to do and look cute hanging on my pc. This pattern for premature baby booties is by Beverly @ http://www.bevscountrycottage.com/thumb-booties.html

When I was trying to make my own pattern for booties I referred to the sizes chart, also @ Beverly's cottage ( http://www.bevscountrycottage.com/size-chart.html). I didn't think making baby booties would be so troublesome, considering I've made up shoes and slippers for dolls and teddy bears without patterns! I tried several patterns, one I didn't like because it wanted me to keep fastening off and starting over in a different spot, which I believe was unnecessary, a bootie pattern should be simple and in one piece. Another pattern totally miscounted the stitches I'm sure, when I counted and recounted over it just didn't add up so I gave up on that one, too!

Eventually I watched some videos on how to make baby booties on youtube and found one I liked by Theshyrainbow. I couldn't find a website where the pattern was written down, so I've written it down for my own reference so I can make them again without having to watch the video. My pattern is not very clear, it's just for my own notes, so I recommend watching the video. Although it has some little spelling errors, it's quite straight forward and useful.

A baby bootie pattern based on Shyrainbow's youtube vid - be sure to watch her youtube video! http://www.youtube.com/watch?v=e7TCpHbNPCs
1. ch 15, 2 tr (US dc) in 4th ch from hook, tr in next 10, 6 tr in last ch, tr in bottom of next 10 st, 3 tr in last ch, sl st (32 tr counting 1st 4 ch)
2. ch 3, tr in same, 2 tr in next, tr 13, 4 tr in next, 3 tr in next, 14 tr, 2 tr in last, sl st (40 tr counting 1st ch 3)
3. ch 2, htr (US hdc) in same, 2 htr in next, htr 16, 2 htr in next 4 st, htr 16, 2 htr in last 2 st, sl st (48 tr counting 1st ch 2)
4. ch 3, tr in same, tr 46, sl st (48 tr counting 1st ch 3)
5. repeat row 4
6. ch 3, tr in same, tr 14, (tr decrease every 2) 3x, tr 4, (tr decrease every 2) 3x, tr 16, sl st
7. for top of toe I use a contrast colour, join in 12 st from main colour (9th st from centre of toe), ch 1, htr 16, turn
8. ch 2, sk 1, treble don't pull through leave loop on hook * , sk 1, trebel *, sk 1, treble *, etc to end, you should have 9 loops on hook, pull through and fasten off
9. back to main colour which is still at the heel, ch 1, dc (US sc) in same, dc 9, decrease dc over 3 in the corner, 2 dc in next sp, 1 dc in sp just right of centre, 1 dc in sp just left of centre, 2 dc in next sp, decrease dc over 3 in corner, dc 12, sl st

I added my own ankle cuffs (not in the video) ...
10. for ankle cuffs, ch 3, tr in same, tr in ea st around, sl st
11. and 12. repeat row 10.
13, 14 and 15. in contrast colour, repeat rows 10-12,
16. I added a hook at the end in case they ever get hung up somewhere because they look so cute, ch 10, sl st in 1st ch, fasten off.

Thursday, August 19, 2010

Small Aqua Doily

This was going to be a drink coaster, but I wasn't quite happy with it and it's now a doily on David's bedside table! The pattern for this doily came from a book I got from a second hand store at Toowong for $11. This pattern is on page 56 and the book is called 'Beautiful Lace', published by Nihon Vogue in 1982. When I finished it, it was very wonky, so I gently ironed it and it came out ok. I do want to have another go at making cotton coasters, or I might end up making some out of plarn.

Today, I was very naughty and bought some new baby wool! I know I should use up the wool I have first. I already have some baby wool in lilac, white, pink and a greeny orange variation. But I was very keen to get some stronger shades of purple and some green to match so checked out Lincraft today as some of the nicer baby wool is on special. It's very naughty of me, but I got some expensive pure Australian wool machine washable baby yarn in bright shades of green, blue and orange.  I was after some brighter colours in really nice baby wool so I can make a colourful and cheery jacket, hat and bootie set, I can't wait to start on that one!

I also bought some cheaper 100g balls of purple and green which I might make a baby rug with, and some alpaca to make another pair of fingerless gloves for David as he has asked for some.

At the rate I'm going, I don't think I shall ever use up all my wool!!!

Sunday, August 8, 2010

White Flowers Baby Blanket


This one took me a couple of weeks and turned out to be 65cm x 80cm. I used a stitch from a pattern my mum has leant me which I thought was very pretty and have been meaning to try for quite a while. It turned out to be simple enough, for some reason I thought it would be hard! I like the idea of crochet flowers that are not seperate granny squares that you join up together after you've made them, this is just a single piece. Turns out this is about the same size as my green and white baby blanket, just seems to be the right size. I used the three balls of variegated white with tiny flecks of colour like pink, blue, green and orange in it which was part of the pile of wool my mum gave me for my birthday. It's very nice and perfect for a lovely new baby blanket!

<3 <3

Wednesday, August 4, 2010

Easy Yellow Doily

When I got my regular message from Crochetspot this pattern was highlighted so I decided to give it a go. It was called a beginners doily and I whipped it up one Sunday morning, finishing it before lunch.The pattern for this easy doily is at Crochetspot. http://www.crochetspot.com/crochet-pattern-hipster-doily/

I don't know what I'll do with this doily, I just made it because I was bored! I like how the clusters in this one look more like triangular sun rays rather than rounded flower petals.

<3 <3