Showing posts with label crochet animals. Show all posts

Wednesday, October 2, 2024

Crochet Vests for a Small Dog

 Now its spring, but during the winter just gone, I made 3 crochet vests for our maltese/shitzhu dog named Duke. I used 8 ply cotton, wool or acrylic yarn and a 4mm hook. I worked it out to be simply a tube with 2 holes for his front legs. I think he liked wearing them!

the first vest I made was in blue cotton

the 2nd vest I made was in this dark purple wool


the 3rd vest I made was in acrylic yarn


Tuesday, May 1, 2012

Frog and Lion Faces

I'm fooling around with some ideas for kids, and came up with some animal appliqués. I'm wondering if they will look fun on a pair of socks or slippers?
lion and frog face appliqués
These were pretty easy, I just started with 12 dc in a magic circle, then a 2nd round of 24 dc. After that its easy to add ears. For the lions, I changed colour and added 5 ch behind every dc to form the mane. For the lion eyes and frog smile I crochet sl st in white. The frog eyes are a round of 12 dc. Finally I finished these with some embroidered black cotton. I'm thinking I need some embroidery lessons, as I need to get better at that!

I'm not quite sure what I'll use these for, but I suspect they may come in handy at some point!

Monday, March 19, 2012

Purple Flowers & Blue Butterflies

I've made up these little flower and butterfly embellishments to go on a larger project I've been planning for a while. I couldn't find any patterns for these that I liked, so I made up my own! I want to write down some notes here on how I made these so I remember what I did for next time.
purple flowers and blue butterflies
I used a magic circle to start the flowers. One flower started off with a pink 10 dc centre, but I prefer the other flower which has a pink 5 sc centre, then a 2nd round of 2 sc in every sc. Then using purple, a petal is (2 ch 3 dc 2 ch sl st into same) sl st into next, sl st into next, repeat petal, sl st, sl st to create 5 petals.

I was inspired to make these butterflies by some I saw on Pinterest, but I didn't follow anyone's pattern. For the butterfly, I started with a 4 ch loop, then 4 ch 4 trbl 4 ch sl st into loop to form one large upper wing. For a smaller lower wing, ch 2 3 dc ch 2sl st into loop. Repeat a small low wing and a large upper wing to complete the butterfly and fasten off. In a contrasting colour, tie some wool around the middle and knot it at the top to form the antennae.

I used a 4mm hook and some of the classic wool from the Bendigo Mill for these. I'm looking forward to seeing them on a two way tea cosy I'm going to call "Royal Garden"!


Tuesday, January 17, 2012

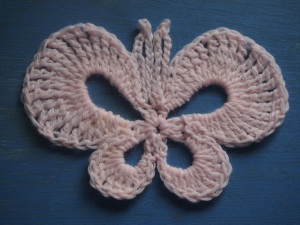
Pink Butterfly

I was thinking to crochet a butterfly to go with the small pink cap, so tried this one. It's not quite right for the hat though so I will have to think of somewhere else for this butterfly.

I googled images of crochet butterflies and found one I liked. I followed the chart, except the largest stitch I used was  a triple treble. That's when you yo (yarn over hook) 4 times. There is a larger stitch in the chart which looks like yo 5 x, after some research I couldn't find the name for that stitch. I decided I would just do triple trebles instead. The result is the two top wings look quite large, I don't think the photo on that site matches the chart. Maybe I will try a variation of this butterfly again with thicker yarn so it is a bit firmer, and with some of the stitches smaller than in the chart.There was another butterfly I liked I might also try one day.

This butterfly is too floppy for a brooch, maybe I can stitch it onto a bag or something one day?

Thursday, February 25, 2010

What to do with a golliwog doll? Octopus Boy!!!


Octopus outfit for a golliwog doll

a small golliwog doll
Ashamed and reviled by society, poor gollywog toy could not face anyone, could not bare to be in the company of people. They assumed he was ignorant and stupid and were scared he would cause trouble wherever he went. But in his heart, he was a peace loving artist who was just misunderstood. "I can't help the way I am!" he exclaimed, alone into the night, and "Don't stereotype me!". In desperation, his fairy-god mother made for him a super hero outfit that would disguise him. Finally, he could be amongst the people proud, content in the knowledge that they would not burn him at the stake like a witch, or stone him to death in a frenzied riot. He was now, and forever will be Octopus Boy!!!!! Hurrah!

Monday, January 25, 2010

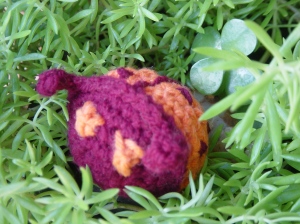
Lucky Ladybug Pincushion

Oh yes, according to the pattern, this here is a Ladybug. As the last project of the day, I had to have another go at it because I had trouble with it the other morning and that ... bugged me! After two days of reading crochet patterns, surely I'll be able to do this.

Well, what I was doing wrong had nothing at all to do with the different crochet languages. Like almost all patterns I've read so far, this one is English. After the reading of the last two days, when I came back to this one I found it was very simple, just a small round ball really. What gave me the problem was I thought the "sc 3" in  "sc 2, sc 2 in 1, (sc 3, sc 2 in 1)" meant "three single crochet on one hole" which of course is wrong and was why I ended up with a hyperbolic shape. I don't know why, but after reading crochet patterns for two days, when I came back to this I saw it simply as "single crochet three stitches each in its own space" lol. It's good to know my feverish production of small crochet projects over the last two days has helped my poor reading skills to improve.

The pattern called for glueing, felting and attaching, but I did none of that. I simply chain stitched the attennae as part of the chain stitch that goes over the top between the two colours, and used embroidery stitches for the eyes, dots and fine line at the back. A very simple project I'm unlikely to do again unless someone requests it as its a bit fiddly, fussy and not a particularly useful object. It felt like a primary school project to me. What practical use for something like this? Either a pincushion or a little critter for the kid's guest room. On the other hand, if I made this one out of plarn and filled it will plastic, it could go in the garden. We do need a Lucky Ladybug charm for our garden, to eat up all the nasty bugs that the real ladybugs would normally eat, if our landlords hadn't poisoned them all away. So that's where I decided to take the foto, in our garden the next morning. I can sense all the nasty bugs quivering with fear at the prospect of a Ladybug moving in!
Related Posts Plugin for WordPress, Blogger...