Showing posts with label red. Show all posts

Thursday, December 20, 2012

A very long scarf

And here ends the saga of the three scarves! Yet again I spent far too much time on this, when after it all I just ended up making a very simple long and skinny scarf, unravelling an earlier attempt to make a cowl!
this very long scarf is nearly 3 meters long
At first I thought this would be a convertible cowl with home-made polymer clay buttons. But then I learned my sister-in-law prefers long and skinny scarves, not short fat cowls, and then I misplaced the pattern for the started scarf, so this got unravelled. I had to give up on the polymer clay idea because the black clay I had was too old and I had to throw it out, and then when I went to the store to find some more they didn't have the right colour! The cowl pattern was inspired by a cowl I saw on pinterest,but I lost the actual pattern for it.
a false start to a long scarf, originally it was going to be a cowl
I was more than half way through the convertible cowl idea, when I had put it down for several months. Come Christmas it was time to finish it so I could give it as a gift, but then I couldn't find the pattern I was working on so started to unravel it to work it out, thinking I would only undo a little bit. But it unravelled a lot more easily than last time I tried to unravel this yarn. And because I was convinced Liz would prefer the long and skinny, I just kept unravelling.I ended up using the 7mm hook and doing a width of just 10 dc so the scarf is extra long and skinny.

This scarf is so long, it can be doubled over, maybe even thrice over. It measures a very long 2.8 meters, and is skinny so if it was doubled over it will be nice, thick and warm. The perfect thing for winter ... when it gets here!

Tuesday, December 18, 2012

Blocking the Red Doily

Talking of doilies that needed blocking, I was horrified to realise I had put up this red doily for sale without blocking it first! When it dawned on me, I set to the task of getting that done quick smark. LOL!
red doily after blocking
blocking the red doily onto a piece of white foam using sewing pins

Wednesday, December 5, 2012

Red 10 Round Doily

I sat up one night and quickly scribed the diagram for this design. I was inspired by the 4 round doily, which in turn was inspired by a picture of a doily from 1893, but I extended the 4 round doily to 10 rounds, I drew the diagram first, and then when I made it, I was almost surprised that it actually worked!
my 10 round doily design
I used a 2mm hook and red 4 ply mercerised cotton. I hope to share the pattern with you one day, I am looking at some software that I will hopefully be able to use to draw the crochet chart diagram!
the doily is the perfect size to go under a vase

Tuesday, December 4, 2012

Tiny Two Round Flower, free pattern

I made these four flowers using the tiny bit of yarn left over from making my latest spiral bunny rug. Its pure merino wool, so I couldn't waste it!
tiny two round flowers made with left over merino wool
I made them to go in my shop because I'm making a theme in my shop in festive colours. I used a 3mm hook and the wool is 4 ply. I made two Irish Roses, just following the traditional pattern you can find for free with a google search. Then I had enough for just two more tiny flowers in two rounds. The first round is 6 sc, the petals are ... wait, I think I need to write you the pattern!

Tiny Two Round Flower
gauge not important, hook and yarn will determine the size of the finished flower, I used a 3mm hook with 4 ply wool
1. 3 ch, sl st into 1st ch to form loop, ch 1 6 sc into loop, sl st into 1st sc
2. (2 ch 2 dc into same 2 ch sl st into same) repeat into each sc to form 6 petals
I also made two Irish Roses with the left over yarn, following the traditional pattern

Monday, December 3, 2012

Festive Spiral Bunny Rug

I made this new spiral bunny rug in Festive colours to help spruce up my banners in time for Christmas. I've also put it up for sale in my online shop, I wonder if anyone would like to buy it?
detail of the festive spiral bunny rug
It measure 66cm across, or 26 inches, and 3mm thick. I used 3 x 50g balls of pure Australian merino wool in 4 ply baby yarn, I bought it on special earlier this year. I used a 3mm hook, and it took me just over a week to complete. Now I know how to do these, this one was considerably quicker than the last spiral bunny rug I did, which was in lavender, leaf and stone. That one took me nearly a month to finish.
festive spiral bunny rug on a chair
As long as I remember the first round is 6 sc in one colour, then split into the 3 colours in the second round which is also sc. Then the third round starts the dc. I also used a lareg saftey pin to secure the two yarns I wasn't working with so there would be no unravelling. And I caught each colour up to the others, so when working with one I could go all the way around, this reduced the amount of time wasted picking up a new colour.
down view of the spiral bunny rug
I had a tiny bit left over, and not wanting to waste any of this precious yarn, I made a few small flowers to sell in my shop. I'll post about those tomorrow!

Wednesday, November 28, 2012

Lots of Heart

The very first post I made on this blog nearly 3 years ago was about a tiny heart I made while first starting to learn how to read crochet patterns. The post was called a little heart, and the heart is now a magnet on our fridge.

five small hearts for sale in my madeit.com online shop

 Last week I got an order from a past customer who likes to buy small crochet embellishments to go on her craft projects. This time she wanted 20 little hearts, so I made her 22 as well as a free sample to go in her package. I use a different crochet pattern nowadays. My favourite is Suzi's little heart pattern, it's so easy and makes up quick so I can afford to charge a reasonable price.

an order of little hearts completed for a repeat customer
A little heart has become lots of heart! I think this is an indication of how far my crochet skills, and my blog have come in just a few short years.
a free sample sent to a repeat customer

Tuesday, November 27, 2012

Pair of Red Doily Coasters

I wanted to make some red things for my online shop at madeit.com to make it look more festive. I had some of this thick cotton blend in red left, but only enough to make a pair of large coasters.
a pair of red doily coasters
 Because this 60% cotton 40% acrylic blend is so thick, I used a 4mm hook. I followed my four round doily pattern which then made these generously sized. This time, the last round has scallops of 7 dc instead of 8 dc, and the start has a loop of 4 ch.
these coasters are generously sized

Thursday, November 8, 2012

Tiny Shells Newborn Beanie

Using a larger hook and thicker yarn, my tiny shells premmie beanie becomes big enough for a newborn, like this one I've made using organic 8 ply and a 4mm hook.For this newborn sized beanie, just follow my tiny shells premmie beanie with the larger hook and thicker yarn!
tiny shells newborn beanie

Sunday, October 14, 2012

Three Spring Flowers

I felt an urge to do make some flowers, for no particular reason other than it is spring. I wonder if I can make headbands for them to sell?
3 spring flowers made with 4 ply cotton and a 2mm hook
I didn't follow a pattern for these flowers, I just made it up as I went along, but it is based on the traditional Irish Rose pattern, which is widely available on the net for free if you do a google search.
red Heather's Irish rose
The red rose has my own centre that I call "Heather's Rose", that's why the red one is "Heather's Irish Rose"! I'm basically fooling around with the colours I have here because I'm loathed to spend any more money on yarn, but maybe I will just have to get some different colours ...
tri-colour Irish rose in 4 ply cotton
I decided this tri-colour flower needed something extra, so I made a fabric covered button to go in the centre using a scrap of fabric from my stash. I just used an old plastic button that had a hank on the back.

Tuesday, August 14, 2012

Knitted Red Bonnet

Here is the knitted red bonnet I wore as a small child, my mum has just given it to me. I remember wearing this hat, even though it was nearly 40 years ago! This was not made by anyone I know, I think my mum bought it from a shop.
a red knitted bonnet that inspired me to make another bonnet
It was the memory of this hat that inspired me to make a bonnet for Barbie in the same shape. Its simply two squares sewn together with a tie to hold it under the chin. Very simple!
the pink bonnet I made for Barbie

Friday, July 27, 2012

The Poncho my Mother Made

Here is the poncho my mother made for me when I was a toddler. I remember wearing it until it no longer squeezed over my head! There's a photo of me when mum first put it on me and it reached down to my toes! I got a lot of wear out this, and 40 years later its still holding together.
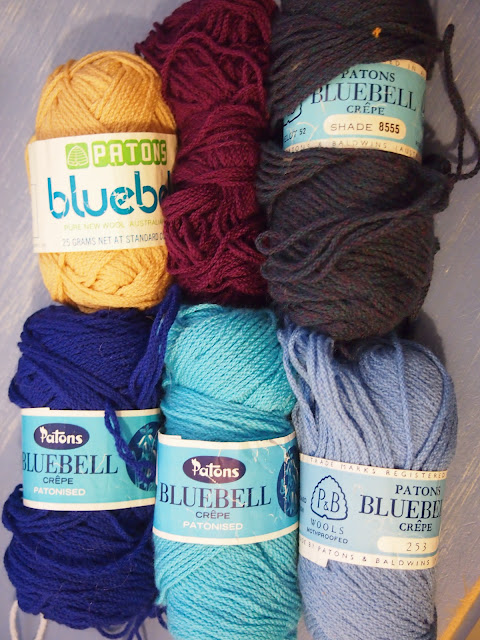
The old cherished poncho my mother made for baby me, using Paton's Bluebell
Mum used the 5 ply Paton's Bluebell for this, which you can still buy from Lincraft. I have a few vintage balls, some with the old labels still on. The poncho has started to felt in places after many washes, mum says she just chucked it in the washing machine! A couple of clusters are unravelling, so if I get a chance I might repair it.
vintage balls of Paton's Bluebell, which is still available
This is a precious thing I remember from my childhood which my mother made especially for me. Its the special things that are handmade by someone you know that are the most treasured.

Wednesday, July 25, 2012

Red and Black Basket

I started this basket on Monday 16th July while I waited for the doctor. Taking along a crochet project to the doctor's waiting room has become a necessity, as invariably she will keep me waiting, sometimes up to 50 minutes.
red, black and grey basket I made for my husband
 I asked my husband if I could make him something and he said a basket for his desk would be useful, so I planned to make this for quite a while. His birthday is next month so I made a start on it, but it took a lot less time to finish than I thought, taking just a couple of hours. Using 7mm hook and red, black and grey acrylic, the base is a flat circle of sc. Before stopping to increase I did 2 rounds of cables at the increase, the other stitches in those rounds are bpdc to keep the height the same. It created an interesting corner at the base of the basket. Up the sides I spiralled instead of sl st then ch, so the starts are invisible. I then used a yarn needle to sew in each of the 3 yarns for a neat finish.

This is a gift for my husband's birthday, I hope he finds it useful.

Monday, July 16, 2012

Heather's Rose with stamen

I had a thought that stamen could be added to the Heather's Rose before the first round. Here's an example, with the yellow stamen added before the first round of 6 dc.
Heather's Rose with optional stamen, designed by Teena Sutton Murphy
Before starting the first round, 7 ch then sl st back along the ch, 7 ch then sl st back along the ch,this forms two stamen. Then do the first 3 dc of the first round. Fold the stamen forward so you can do the other 3 dc on the other side of the stamen. This will make the stamen sit in the middle of the 3rd round of internal petals. Well, I think it looks pretty, if I do say so myself! I'm still working on how to explain the folded internal flowers, I hope to share the pattern with you very soon!

Friday, July 13, 2012

"Olives & Wine" Two Way Tea Cosy

I finally finished this two way tea cosy on my birthday, it was fairly simple to do. I've started writing the pattern down so I can hopefully get it pattern tested very soon.
the main side of two way tea cosy, "Olives & Wine"
I chose these colours mainly because this is what I mostly have left of the classic wool from Bendigo. My mum gave me the wine coloured wool called 'cognac', but it wasn't soft enough to make the beanie and scarf set she thought it would be good for. So some of it has now been made into this tea cosy! I purposefully made this one plain with stripes instead of flowers, in case a tea drinker I know of would prefer a cosy that's not too pretty!
in case you don't like stripes, turn it inside out for a deep red cosy
One side of the tea cosy is stripes of maroon, purple and green. Turn the cosy inside out and its all maroon. Nice and easy!

Saturday, July 7, 2012

Small Red Heather's Rose

Here's the second Heather's Rose I've made, this time using some shiny red yarn and a 2mm hook. I pinched the inside petals to make them sit up more, and the bottom petals curl, so this is a 3D flower.  Next time I will make one of these in two colours.


small red Heather's Rose designed by Teena Sutton Murphy
I'll give this to my mum, as well as the first Heather's Rose I made. She likes to make jewellery, maybe she can turn this little red one into something nice? I'm still working on the pattern, and hope to share it with you soon <3

Tuesday, June 19, 2012

Best Teacher Apple Brooch

I wanted to make a simple gift for Thomas's music teacher Miss Katie, as today was our last day. I thought to make a small apple brooch but I had trouble finding an apple pattern I liked so ended up making up my own!
apple appliqué by Teena Sutton Murphy
 I tried several different apple appliqués using different yarns, included 8 ply acrylic. In the end I decided the 4 ply red cotton was best. I used a 2mm hook and my own pattern. I learnt how to make apples from 'ing-things' blog, but then changed the pattern to suit the 4 ply. The apples I made using her pattern are the large ones with dark green leaves. T o find out how to make the ones with dark leaves please go to her blog.


a selection of different kinds of apple appliqués

Apple Applique Pattern by Teena Sutton Murphy in US crochet

(for UK crochet sc = dc, dc = trbl, trbl = dbl trbl)
1. 3 ch (counts as 1st dc), 11 dc into 1st ch (12 dc)
2. 3 ch (counts as 1st dc), 2 trb in next, 2 trbl in next, 2 dc each  in next 7 dc (14 dc), 2 trb in next, 2 trbl in next,  3 ch sl st into 1st ch (24 st)
3. sc in 2nd ch, sc in 3rd ch, sc in 1st trbl, 2 sc in next, 2 sc in next, 1 sc each in next 7 dc, 2 sc in next, 1 sc each in next 3 dc, 2 sc in next, 1 sc each in next 7 dc, 2 sc in 2nd last trbl, 2 sc in last trbl,  sc in 3rd last ch, sc in 2nd last ch, sl st to 1st sc
For the leaf and stem, I followed the pattern at ing-things.


I prefer to stitch on rather than use a glue gun

I don't like to use glue, so I don't own a glue gun. I don't know if they work better but as a rule I prefer not to use glue as in my experience it just falls apart. So I stitch the brooch pin onto the back of the applique, I think it stays on better that way.
apple brooch for best teacher
I think Miss Katie liked her special apple brooch that we gave to her today, I wonder if anyone else will want me to make this for them? I think I could make a few for an online shop when I get around to it!

Wednesday, May 9, 2012

How to wash hand-made woollens

Its really important that hand-crafted woollen items are cared for properly. I wash all my garments before giving them to customers so they can wear them straight away.
drying woollen beanies flat on a towel
I recently had to wash a bunch of monster beanies before giving them to customers. First I washed them in luke warm water and Earth Choice wool wash. Then I rinse them in cold water and squeeze them gently. I then lay them on top of a towel on top of my kitchen table and gently ease them into shape. I pinch the ends of the scales and teeth to make them more pointed. I press the double tails together to make them stand up better, and pull the bottom scale of the tail into shape.

I hope the washing instructions are not too tedious for the mothers who have bought these beanie monsters!

Here are the washing instructions that I now write inside my hand-made labels.

O.O.A.K. Monster Beanie
luxury Australian wool from Bendigo Mill, VIC
* gentle hand wash in luke warm water and wool detergent, rinse
* squeeze gently
* dry flat in shade
* ease into shape
* pinch scales and teeth while damp to make them pointed
* do not tumble dry
* do not iron
* do not bleach
www.flushedwithrosycolour.com
<3

Wednesday, April 11, 2012

Red Monster Beanie with tail

I've been planning to make more of these monster beanies for the coming winter, and here is one I finished on the Easter weekend. This is the second one I've made, the first monster beanie I made was finished in January. Quite a few people have asked me to make some for them, but I'm now thinking I probably won't manage to get them all finished in time!
red wonky-eyed monster beanie
For this beanie, I used the luxury wool from the Bendigo Mill and a 4mm hook. This beanie fits a baby up to the age of 12 months, as its a tight fit on my 16 month old son. I was fairly happy with the beanie except for the seam at the back. This flaw was really bugging me as it was an otherwise perfect beanie, so I added a scaled ridge along the seam. I figured this would be fine for a monster beanie, and it worked out quite well!
my first monster beanie tail
After finishing the beanie, I simply work my way back up the seam with these scales. I start with sk 1 (3 dc 2 ch 3 dc) sc, repeated 5 times for this small beanie. Then the 2nd last scale is a bit smaller (3 hdc 2 ch 3hdc) sl st, and the last scale is the smallest (2 hdc 2 ch 2 hdc) sl st. I worked out a better way to attach the eyes too. I simply added them with sl st along the edge, which I think makes a neater finish. I have to cut the white wool and thread it through the beanie to be able to do that. I make the cut end about 8 times the diameter of the 2 round white part of the eye so there is enough yarn to edge the eye onto the beanie. Finally, the white teeth are similar to the scales sk 1 (2 dc 2 ch 2 dc) sl st, repeated. I tried doing 6 teeth, but in the end I decided it definitely looks better with just the 4 teeth!
wonky eyes and goofy teeth
I left this beanie with my mother-in-law, whom we stayed with over Easter, to give to one of her other grandchildren. I hope it fits and they really like it! Now onto the next beanie, which shall be ... purple!!!

Wednesday, March 14, 2012

Red and Green Striped Toy Sleeping Bag

I made this bag for a toy I was given at an RSPCA Op shop. I wasn't there looking for soft toys, I like to go there to source second hand books for Thomas. I have managed to build up quite a collection of good quality board books, and he is well on his way to becoming an emergent reader.
For this quick little bag I used some acrylic yarn. The pale green was given to me by my mum, and the red I bought from K-Mart. I can't remember the project I bought the red yarn for, but it's been used in lots of projects since then, like my red Lady Bird two way tea cosy. I used a 4mm hook to make this up quickly, it took about an hour.

Should I explain how I made this? It wasn't too hard. I began as if I was making another little bag I like to make, keeping the yarn and carrying it over to the next round to create the stripe. When I got to about head height of the toy, the rounds became rows as I left a space for the face, turning back the other way for the next round. Three rows in total create the face space, then 11 ch and sl st to close it up again. Then a round of dc, 11 of which were in the chain, then a row of sc to join the two sides together. Then I switched to green to do a round of sc around the inside of the face space, then a ch to thread in and out through that round of sc to create a drawstring. See? Not too hard at all!

I might pop this into someone's birthday present along with some other things. I hope they think it's cute, I do!

Tuesday, March 13, 2012

Baby's Easy Red Bow Tie

I quickly whipped up this smart looking bow tie for my baby to wear for good luck on a special day!

I looked on google for images of "easy crochet bow ties". I could see straight away how I could make one for my baby to wear so I made it within an hour. Luckily, it was a Saturday morning so David could look after Thomas while I made it before we got ready to go to the birthday parties!
easy red bow tie for a baby
Using a 4mm hook and some red acrylic I bought from K-Mart a while ago, I started by making a little red bag, then closed it up to form the main body of the bow. I fastened off then made the middle section, then the neck strap which is closed with a button. It was pretty easy!
easy bow tie in progress
I just meant for this to be a bit of fun, to lighten the mood on a potentially difficult day. Sometimes its a good thing to look silly. Especially if it's your baby, then he just looks super cute!
Related Posts Plugin for WordPress, Blogger...