 |
| a red knitted bonnet that inspired me to make another bonnet |
 |
| the pink bonnet I made for Barbie |
 |
| a red knitted bonnet that inspired me to make another bonnet |
 |
| the pink bonnet I made for Barbie |
 The beanie I made on Mother's Day is too big for Thomas, so I made this one to fit him now. I made it the same as the Mother's Day one, but used a 4mm hook instead of the 4.5mm, so it's slightly smaller. I used Wangaratta Mill yarn that I got from Lincraft on special. There was nothing on the label to say it was a natural fibre so I guess I'll have to assume it's acrylic.
 Happy Mother's Day to all mums, now including me! David made me pancakes for breakfast with a scrummy berry sauce, and Thomas did his bit by being very cute!
 It's been wonderful finally having Thomas at home, and David home from work too, so we can play happy families. Thomas has been doing very well, drinking his milk and putting on weight, what a good baby! But David had to go to work today, and I'm now on my own with the baby. He's still sleeping so I've got a chance to post up a couple of photos of things I made that I haven't posted yet.
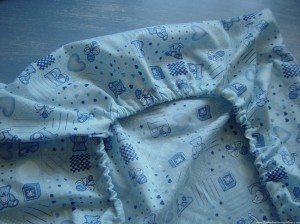 We bought the bassinet when Tom was in hospital, it was lucky we had a chance to get some things, we also got his cot for when he grows. But the bassinet only came with a frilly quilt not a sheet, and the SIDS guidelines say to remove all the frilly unnecessary stuff. So I made a fitted sheet of my own. I did it very roughly, just hacked at a piece of printed cotton and sewed up the corners. Then I made a pocket around the inside edge, it was very rough with all 4 corners left open. Then I thread some elastic through the pocket with a safety pin. I even forgot I left the safety pin in the pocket and only took it out last night, sewing the two ends of elastic by hand. I was reluctant to use up any more material to make another sheet because Thomas won't be using the bassinet for long. Luckily my mum bought us a couple more.
 I made this little white baby beanie when we were 'rooming in' with Thomas in the hospital. I must say the whole experience was very strange. They had us on an overflow ward, and there weren't many people there so they didn't pop in very much. They must have thought we were doing so well they just sent us home early. We were supposed to stay for two nights but only stayed for one. They couldn't find us a single room on the other floor where all the nurses were, and I think they realised it was useless to have me there without David. So far he has been doing all the midnight feeds, and we're not sure how that will work when he is back at work. We were very lucky last night, baby Tom went 7 hours between feeds, so we were able to get some sleep. I think that's pretty good for an 11 week old baby!
 <<< I bought 2m of this warm brown fleece last winter from Lincraft, thinking I could make myself a skirt or wrap dress which I didn't end up doing. So the other day I cut it in half, and then one half was cut in half again to make a 80x80cm square. I then edged it with blanket stitch in a contrasting blue cotton. I didn't do so well when I needed to sew in more thread. I'm sure there is a trick to it, I just don't know it. This is like the material the blankets are made of, and the nurses hospital are using these not crochet rugs which have been donated. But I don't think I'll edge the next one with hand-stitching, I might use my trusty sewing machine instead!
 >>> I made up this beanie using the cream yarn from Wangaratta Mill, which is part of the Australian Country Spinners. If I ever sell anything I make, I would prefer to be using locally made yarn, much like this. I used a 4mm hook and the pattern has the ridges at the increases for the 1st 5 rounds. This one has a turned up brim of 3 extra rounds. I call it a "junior fisherman's hat" because the look of it reminds me of the beanies fishermen wear on their boats on cold, early mornings.
 <<< This curly worm I made for a mobile I'm working on. Its a common pattern, I found one at Art of Crochet by Teresa. You just make a chain, then trb 4 times in ea ch. For a contrasting colour, I did a second round in red with 2 dc in ea trbl. You can make these into bookmarks, Christmas decorations, cats' toys or anything else you can think of. For this one, I used a 4.5mm hook and it just took me a few minutes, so it's a fun little project to do.
 |
| small sea green beanie for a premmie |
 |
| wavey yellow and green dishcloth |
 |
| crochet headband |
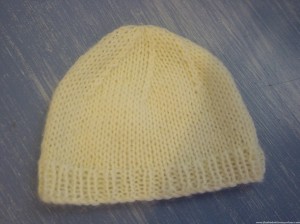 The last two weeks have been surreal to say the least, like a walking dream or day-mare. Some thoughtful soul gave this special beanie to David to give to me, it's what Thomas was wearing in the photo that was taken on his first day. Someone even printed up the photo so I could have it in my room. I didn't see Tom until the second day as I left the ICU to go to the maternity ward. I clung to this special little yellow beanie during my stay while I was away from my baby, I even imagined it smelled like him! I give thanks to the person who made and donated the beanie, and to the person who took the photos of Thomas wearing it, and also to the person who thought I might like to keep it when our baby went into the humidicrib and no longer needed to wear a beanie.
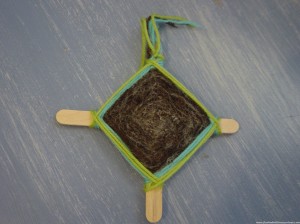 While we were in the maternity ward, on the meal tray was a paddle pop stick. We guessed they were meant to be for stirring tea and coffee, which we thought was a waste of wood. Imagine throwing all those not needed paddle pops away? What a waste of trees! So I collected a few and made some into dream catchers to pass the time. When we left the maternity ward and David went home to sleep, I told him to take the brown dream catcher to place above his bed. It is meant to be for good luck in catching your dreams so they can come true. I learnt how to make these from school, you just weave wool in and out, around the sticks.
 I had a go at adding a flower to the child's sun-hat I made the other day, using a tradition Irish Rose pattern. I think the end result is very cute, if I do say so myself!
 I wasn't sure how the colour changes would go, but it worked out fine. I changed colour after doing the back posts and chain foundations for the next row. I made a 6th petal, although the pattern I followed had 5, as I prefer it this way. A couple of buttons added to the centre provided just the right amount of embellishment. I'm glad a couple more of my homeless buttons have found a new home. This flower is not removable like my other flowers I make for hats, I just sewed it right on securing it tightly.
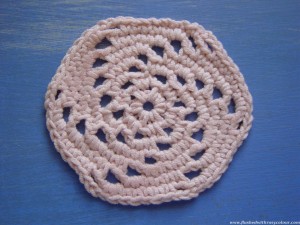 <<< Here is a quick spiral coaster I made in pink following the coaster pattern at crochetspot. This coaster is currently under our water bottle at our pcs to soak up any condensation.
 >>> After a discussion at crochetspot about the first thing you ever made, I remembered these things I used to make as a child. I don't have any of the originals left, so made this one recently. When my mum taught me how to crochet, she first taught me how to chain, then how to crochet into a circle. I have a memory of continuing the first round for as long as I could fit the hook into the centre, making the stitches over and over on top of each other, as I didn't know how to start the next round! I didn't know what else to do with them at the time, so I made a chain handle and decided they should be Barbie doll handbags! Now this one is hanging off my pc with the purple premmie booties I made!
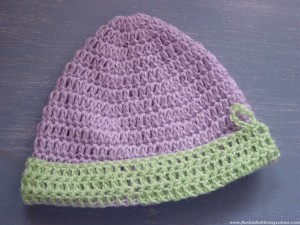 <<< After spending a couple of hours window shopping for babies things on the weekend, I was inspired to whip up this little beanie while I recovered on the couch! It was amazing that I had the
  EXACT amount of yarn left for this, which was great as I wanted to use it all up. This was the last of the arcylic baby yarn from Lincraft. I used the lincraft pattern and a 4.5mm hook. This is the same pattern as my green and orange baby beanie and my purple and white baby beanie, but this one is the bigger size for a 6 month old, as my baby is due in summer and should be in winter clothes by then.
 This is the most expensive wool I've ever bought, but it was on special and I just couldn't go past this gorgeous blend of silk, bamboo and wool. I chose a colour similar to another hat I've made, because my sister-in-law said she liked it.
 In everything I make I would like to include a little of what I call 'wabi sabi'. Apparently it's a Japanese term that means imperfect perfection, and is often included in handcrafted art works! I think it helps remind me that not everything can be perfect, no matter how hard we try. It's much healthier to accept and appreciate the beauty in handcrafted things that often include a slight flaw and lend the piece some personality. It also helps me avoid an obsession to try and produce perfection, which can be very frustrating as I find little flaws irritating! The 'wabi-sabi' in this piece is hidden at the base of the rose brooch! If you see it you will know this is a homemade piece made with affection.
 I also put it on David's head for a while to make sure it was big enough, which was pretty cute! Sorry I forgot to take a photo of that, lol. I'll be posting this one off with the first one I made like this as a pair, which is a smaller size. Hopefully these two will get some wear, I'm just sorry they didn't arrive in time for winter!
 Enjoy and Happy Birthday
 |
| pretty outfits for four Kelly dolls |
 |
| how I found these 4 dolls at the market for 50 cents each |
 |
| matching beach outfits for four Kelly dolls |
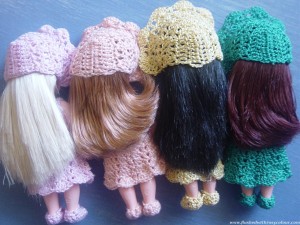 |
| after some hair care the bonnets fit perfectly |
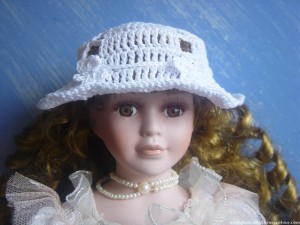 The purpose of making this sun hat was to practice before trying to make one for a child, possibly my niece who has gone back to live in Darwin and has no use whatsoever for one of my winter beanies!
 The hat was a little loose on the doll and I made it that way so it wouldn't ruin the doll's curls. But it wouldn't stay on! Looking at the completed hat I decided it needed some more five petal daisies to match the one in the centre. So I came up with the idea to make a little daisy garland to go round the hat to keep it tightly on the doll. The daisies in the garland are the same size as the daisy on the hat, but are made differently so the tips of the petals are not joined in a round. The daisies on the garland were (3 ch, sl st, 3 ch US treble into centre cluster, 3 ch, sl st into centre) repeat 5x, then each flower was joined with 15 ch. I had to do the final sl st of each flower on the opposite side to front so they would sit properly on the garland, all nicely facing the front.
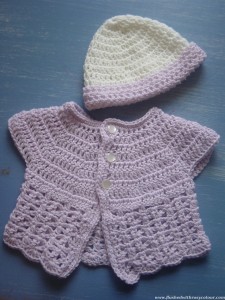 This was an easy jacket I made following a pattern David's sister Michelle got free for me from Spotlight, the hat I made using an easy pattern from Lincraft.
 The hat was the first of these that I made using a pattern from the Lincraft booklet I bought some months ago. I then had a go at the matching jacket but I just couldn't make sense of what the pattern wanted me to do. My M.I.L had a look at it for me and tried to explain but in the end I decided it was harder than it deserved, so I gave up and had a go at the pattern from Spotlight, which made more sense to me.
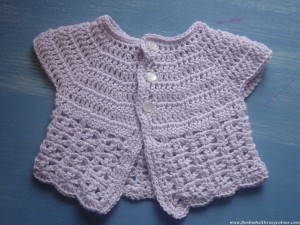 For the jacket, I used more of the purple dimples baby yarn from Lincraft, this pattern required a 4mm and a 4.5mm hook. It's a straight forward pattern and now I know how to do it, I'm sure I could make more variations of it. I really like the stitch in the skirt, so much so that I'm also working on a scarf using the same stitch. I think it looks like a pretty flower or star pattern. The buttons are recycled from my old stash and I think they suit perfectly! The pattern has sleeves, and also says to thread a ribbon around the waist, which I can choose to do later if I wish. For now, I think this is ok!
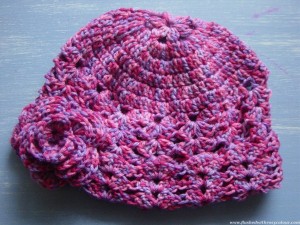 I bought 5 balls of this 'Berry Mix' Lincraft DK wool last year for my birthday, thinking I might make a simple rug with it, but of course that hasn't happened! This is my post for this week's Pink Saturday blog party hosted by Beverly @ How Sweet the Sound.
 I made this flower hat one evening while watching some television, the final episodes of Bones and Castle to be exact! I call this hat a 'flower' hat because I started it off with a small 6 petal flower. Each petal is a cluster of 3 trebles all pulled together in one stitch, each petal is then separated by 3 chains. Then I work out in flat rounds, increasing slightly each round until it was just slightly smaller than my out-stretched hand. Then I used the shell pattern down the sides as I did with my wine coloured beanie. This pattern usually makes hats smaller so I was careful to make sure this hat would fit an adult.
 This is now the 3rd rose I've made like this to make into a detachable brooch to go with the hat. I still had to refer to Rachel's pattern at Crochet Spot as I haven't yet memorised it. I highly recommend Rachel's website if you are in need of some crochet patterns, its very nicely set out. Just remember her patterns are in American crochet, not English. The cost of the wool I used for this hat and matching brooch was less than $2, and I used a 4mm hook.
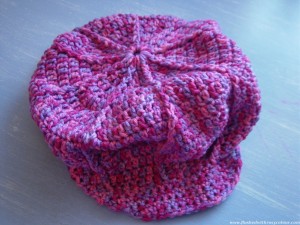 Using the same wool I also made a hip-hop cap following the pattern in the Crochet 08/09 booklet from Lincraft. I didn't check the gauge so that might be why this hat turned out a bit on the big side, although I'm not sure if it's meant to be like that! It didn't take me long and I whipped it up in about 3 or 4 hours while we watching tv and David was cooking.
 I've made a flower to go with the white hat I made about four years ago without a pattern. I like to call the flower I made for it "The White Rose of Peace" ! This is my post for this week's White Wednesday blog party hosted by Faded Charm.
 I prefer to attach these flowers to a safety pin so they are removable according to whim and fancy! This one was made with white wool I was given amongst a large unwanted stash by the mother of a friend, and I used a 3.5mm or 4mm hook for the flower.
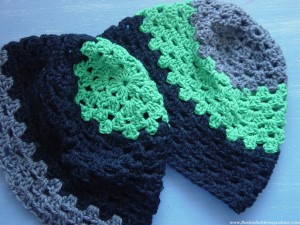 This is the post I planned for today's Transformation Thursday party hosted by The Shabby Chic Cottage, but who would have known that today we also have some special news to share? We have a 3rd member of our little family on the way or so the home test I did this morning says, so this family of three beanies seems especially appropriate!!!
 Basically, you start with a round of 6 clusters of 3 trebles (American doubles) each separated by a chain, the second round has 12 clusters, 2 in each space, each pair is also separated by a chain. Except for rows 5 and 9, you just put a cluster of 3 trebles in each space. For rows 5 and 9, put an extra cluster in every 3rd space, divided by a chain. I know that's not the right way to write a crochet pattern, but I can hardly read them myself, so that's my understanding of the pattern! It's pretty basic and very quick to do.
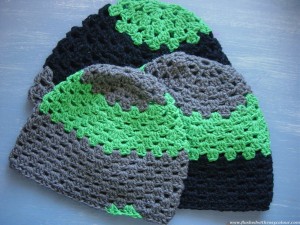 For the first hat, I used a 5mm hook which made it fit me. For the second hat I used a 6mm hook so the hat is bigger and fits David. To consolidate the pattern in my mind, I made a 3rd beanie just with left over green and grey as I'd run out of black. The pattern and the wool are the same, the only thing that's changed is the hook. For the smallest hat I used a 4.5mm, and it's a good thing I didn't use the 4mm like I nearly did then it would have been too small! I rather like how the odd two green clusters look at the brim, it makes it look quirky!
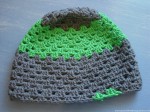 This was a great exercise for me to do. I've now found a great, easy and quick beanie pattern that I can memorise and I can simply change the size of the beanie by using smaller or bigger hooks! These three beanies were very quick and took less than a day to whip up!
 I started this apricot coloured beanie ages ago, and now it's finally finished!
 The pink dress I made especially for today's Pink Tea Party could very well be the most beautiful thing I've made so far! I think my Barbie is very pleased to have something so nice to wear to the party today, which is to celebrate the 2nd anniversary of Pink Saturday and is hosted at How Sweet the Sound.
 Using a 2.5mm hook and a small ball of baby pink yarn, I started the doll's dress on Monday afternoon and finished midday Tuesday, so it took less than one day. This is not the first dress I've made like this, although I think it's an improvement on the orignal because it crosses over at the back so you can't see her knickers - if she is wearing any! The Barbie dresses I make are inspired by a dress I've kept and treasured from my childhood which my mother tells me was made by my Nanna Pam. You can't tell when she is sitting down, but you can pinch the skirt to make pleats appear. I am so tickled pink I could manage to make something as pretty as this!
 In an attempt to preserve the doll's hair as long as possible, I try and keep it tied up in a little snood. Anyone who has collected dolls knows how synthetic hair can ruin over time. But the pretty pink dress needed it's own hat, so I decided to give making a bonnet a go! I looked on google for images of crochet doll bonnets, but there were not many that I could see. I remember a knitted bonnet I wore as a young child which folded neatly into a square, so I made one up kind of like that. I didn't follow a pattern at all, and used the same stitches as in the skirt of the pink dress.
 The tiny coffee table needed a pink doily, don't you think? This is my first completed proper doily and it took me between 2 to 4 hours I think, finishing it last Thursday morning. I used a pattern in a book I borrowed from my local library on Monday called "101 Easy Scrap Crochet Projects". The pattern for this doily is on page 40-41.
 I hope you enjoyed reading about my special pink tea party!