 |
| love heart shaped French toast with strawberries and maple syrup |
 |
| simple love heart cards for the whole family |
 |
| having fun cutting love hearts out of watermelon with cookie cutters |
 |
| love heart shaped French toast with strawberries and maple syrup |
 |
| simple love heart cards for the whole family |
 |
| having fun cutting love hearts out of watermelon with cookie cutters |
 |
| no more black wallets for me! |
 | |
| pink swimsuit for a Barbie doll |
 |
| back of swimsuit |
 | |
| zombie doll head |
 |
| a personalised Valentine's card from moonpig |
 |
| Fluffy-edged Love Heart Pillow |
 | |
| stitching 2 hearts together |
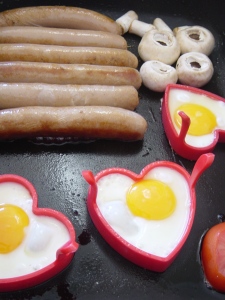 After a couple of hours of me checking the Pink Saturday blogs and he playing a computer game, we got peckish for some breakfast. We were in the mood for our favourite lovey dovey breakfast, sausages and tomato with love heart eggs and mushrooms!
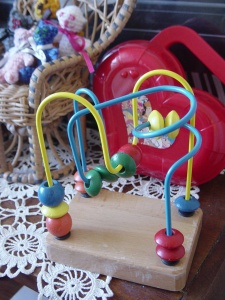 On Saturday, David took me to a Salvo's store (Salvation Army charity shop). We hadn't been there before and there were lots of bargain treasures to be found, some of which I decided I coudn't bring home. One thing I did grab was this very good toy for developing fine motor and hand-eye coordination in very young children. It's pretty solid, not flimsy, so I grabbed it for $3. In the background you can see a red love-heart bag. I can't remember where I got it from but I keep some Barbie things in it, it's so cute. Also in the background you can see my tiny teddies where they live now, sitting on one of the vintage doll's chairs to keep Barbie company. The doily you can see I believe was made by my great-grandmother, which I hope to try copying one day.
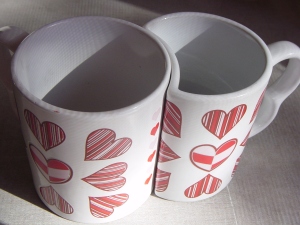 Another bargain treasure we found at the Salvo's store on Saturday were this pair of lovey dovey coffee mugs. We've decided to collect coffee mugs with love hearts on them, as well as other things with love hearts because we are sooo lovey dovey! /awwww... lol! These are probably not so great because the shape means that one is smaller than the other. I don't like the idea that to be in love one person must be smaller.
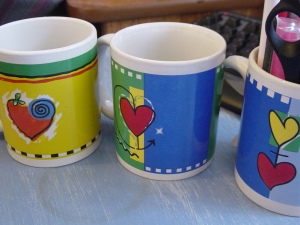 We got four, one broke and has been thrown away. That's a shame, I really must remember to keep broken crockery for my mosaic projects I hope to do one day. Two of the remaining three mugs have broken handles, so one is now used as my pens holder by my pc. That's why I'm afraid to use the 3rd mug for drinking as I have a terrible vision of someone spilling hot coffee over them when the silly handle breaks! But they are just too cute to throw away, they are too lovey dovey! When a coffee handle breaks, it can still be recycled into something useful.
 I also took a photo of this very cute red chocolate tin. It cost me $5 full of chocolates from Coles online last Valentine's Day. I havent' decided what it will be used for yet, but I'm sure it will turn out to be nice. It's sitting on top of the table my great-grandfather made, which I will do a post about one day.
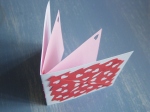 I couldn't post this before yesterday, but this is the lovey dovey card I made for David, wrapped up in a custom-made pink envelope.
 First, I made the snowflake from red coloured paper which I had in my stash left over from my school teaching days (I have kept soo much stuff). This measured 9cm x 9cm. I got the idea for the front of this card from the snowflake greeting card from allfreecrafts.com I carefully glued that with craft glue onto the front of a 10cm x 10cm card cut from white cardboard. I then made a paper insert with pink paper which was 9cm x 9cm. I attached it by handsewing with red embroidery thread a few stitches down the spine and ended that with a soppy bow on the inside of the card.
 I finished off the greeting card with love hearts hole punched into the top right hand corner of the pink paper insert, before adding some lovey dovey words for my sweetheart! Then using some more pink paper, I folded it around the card to form an envelope, trimming it to be neat. I secured it with a small dot of glue on the inside, which I concealed on the outside with a lovey dovey sticker I bought as an impulse. Not very thrifty of me I know, but those lovey dovey stickers were very cute!
 So today, in preparation for the special day tomorrow, we are baking as much as we can in advance, then we will be cleaning the house together! /awww isn't that romantic? Yes, I could have cleaned the house yesterday when David was at work, but that would not have swept away any bad luck from this year that came into our house today (that's my excuse and I'm sticking to it!).
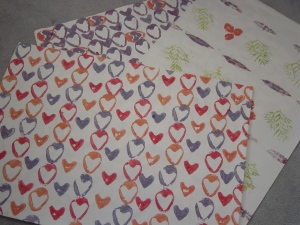 I printed up three pieces of butchers paper yesterday to make gift paper. I'm not sure what a gift will look like when wrapped in it, but hopefully the result will be a charming rustic-earthy look! Goodness knows, all there is to wrapping paper is a simple pattern, and isn't it a nicer thought if you made it yourself?
 I've also been making some gift cards, which I think should be nicer than the store bought thing. I tried the kissing cards which looked like a nice idea, but it didn't work out. To make the two sides stay together I had to make a slit at each lips and push the cards in tightly, which made the rest of the faces mishapen. Another card I tried was this cute little pop out, it's a simplified version of this pop up card video. I glued some scrap from the love-heart print left over from the boxers in the background. Cute!
 I found making this pair of boxer shorts challenging, but I carefully worked through the steps I knew I needed to pull this off. I took no shortcuts like I normally do with my sewing, so I'm proud of the results.
 David likes the love heart motif, but would like to have some choice when buying clothes. Love heart options for women's clothing are abundant, but for men it's pretty much limited to g-strings with hearts on it. And that's just not our style! I saw this love heart printed material and decided to grab a metre with the thought to try and make him some boxer shorts. I would copy a comfortable pair he already has, but making pants in the past has usually resulted in failure. So before doing this, I made a couple of pairs of pants for toys, going so far as to use a paper pattern for the fashion doll pants. Big teddy needed some jeans, so I threw them together from the bottom part of already cut up jeans, to check if I understood the pant pattern shape. Teddy's pants wouldn't be complete without a big cheery red button!
 Today I was ready to try and make David a new pair of boxer shorts. I started by making a paper pattern by copying David's black boxers, leaving space for seams, and cut out the shape. Pinning the material, I cut it carefully in half so I had two pieces of material. I folded a piece in half and pinned the paper pattern to the fold, then cut it out, removed it and did that to the other piece. Then I pinned the whole thing together first, before starting the sewing, something which I normally do not bother to do. First I sewed the tummy seam, then the back seam, then the crutch. The boxers looked huge! But when I checked the size by placing the black shorts on top, I saw they weren't too much larger. I made a pocket for the elastic along the waist, and threaded it through. All that was left to do was hem the bottom of the legs and wait for David to come home so I could check the elastic and sew it up.
 Bouyed by my success, I decided to make the scraps into an itsy-bitsy pair of boxer shorts for me! To my surprise they actually worked and are wearable, David even says they are cute! Needless to say, I won't be modelling them and posting a foto!!
 |
| love heart rag rug made by crochet strips of material |
 |
| the material was cut into thin strips with pinking shears |
 |
| rag rug in progress |
 |
| the love heart rag rug in its place by the back door |