Showing posts with label yellow. Show all posts

Tuesday, October 16, 2012

Lattice and Solid Triangles, free patterns

I first made these triangles like these as part of a free sample pack I sent to my first customer. She wanted crochet shapes to add to her cloth books. Since then, I've been asked to write down the patterns, so I shall attempt to do so! Feel free to leave your feedback in the comments. I will be making these triangles into a pyramid toy for my son. For these triangle, I used a 4mm hook and brightly coloured 8 ply acrylic.
two kinds of crochet triangle, solid and lattice
8 colourful triangles to be made into a toy pyramid
LATTICE TRIANGLE by Teena Sutton Murphy
~ worked in two rounds ~
1. 4 ch, (dc ch 1) into 1st ch 5 times, sl st into 3rd ch (wheel of 6 spokes)
2. sl st into next ch sp, 4 ch 1 dc into same ch sp, (1 dc 1 ch 1 dc, 3 ch 1 dc 1 ch 1 dc) into next ch sp to form 1st corner, 1 dc 1 ch 1 dc into next ch sp, (1 dc 1 ch 1 dc, 3 ch 1 dc 1 ch 1 dc) into next ch sp to form 2nd corner, 1 dc 1 ch 1 dc into next ch sp, (1 dc 1 ch 1 dc, 3 ch 1 dc 1 ch 1 dc) into next ch sp to form last corner, sl st to 3rd ch, fasten off and weave in end
4 solid triangles to be made into a toy pyramid
SOLID TRIANGLE by Teena Sutton Murphy
~ worked in rows until a final round around the edge ~
1. 11 ch, sc into 3rd ch from hook, sc into each ch to end (9 sc + starting ch), turn
2. ch 1, sk 1, sc into next, sc into ea sc to end, sc into starting ch of prev. row (8 sc + starting ch), turn
3. ch 1, sk 1, sc into next, sc into ea sc to end including starting ch of prev. row (7 sc + starting ch), turn
4. ch 1, sk 1, sc into ea sc to end as above (6 sc + starting ch), turn
5. ch 1, sk 1, sc into ea sc to end as above (5 sc + starting ch), turn
6.  ch 1, sk 1, sc into ea sc to end as above (4 sc + starting ch), turn
7. ch 1, sk 1, sc into ea sc to end as above (3 sc + starting ch), turn
8. ch 1, sk 1, sc into ea sc to end as above (2 sc + starting ch), turn
9. ch 1, sk 1, sc in next (1 sc + starting ch)
10. turn to work in a round along the edge, sc into a sc or starting ch of 9 rows down one side, 3 ch at the corner, sc into the bottom of ea 9 ch of the starting row 1, 3 ch at the 2nd corner, sc into a sc or starting ch of the 9 rows up the other side, 3 ch at the corner, fasten off and weave in the end

Friday, August 3, 2012

Spiral Cotton Coaster

I just made this coaster as a template to sell on my madeit shop. I wonder if anyone will like it enough to buy or want the pattern? If anyone does want the pattern, I'll have to add it to my list of things to do!
spiral cotton coaster

Monday, July 30, 2012

Five Pointed Star, free pattern

I included a free sample in with the package I sent to my first real customer and decided it best to pop in some similar items but of different shapes so she can see what else I can make. Included was my attempt at a five pointed star.
a simple 5 pointed star
I included these 6 extra shapes, as well as the tiny butterfly I did yesterday. The circle simply has 12 dc in the 1st round and 24 in the second. The square is a 2 round granny square. The snowflake is the 1st 2 rounds of a snowflake I found at Attic 24, which you can choose to have 2 or 3 rounds. The star and 2 different kinds if triangles are my own patterns. I'm still working on writing the triangle patterns, but here is the star pattern.
6 assorted crochet shapes to use as embellishments
5 Pointed Star in US crochet (UK dc = trb, hdc = htrb)

round 1. 3 ch, work 1st round into 1st ch, 9 dc, sl st into 3rd ch

round 2. into next dc (2 hdc 2 ch 2 hdc), sl st into next dc, repeat 4 more times, sl st into 1st hdc

Sunday, July 29, 2012

Flippy Floppy Scarecrow Sunhat

I've been meaning to make this hat for my son, who just loves the dingle dangle Scarecrow song, for which he required a flippy floppy hat like this one!
Flippy Floppy Sunhat by Teena Sutton Murphy
I took a break from the cabled spiral bunny rug I'm currently working on as it simply taking aaages, and decided to make this hat as I knew it wouldn't take long. It took me a couple of hours, the body made up quickly with my 4mm hook. I used yellow 8 ply cotton from Bendigo, its been sitting here for months and finally I got to take off the label. For the brim I switched to a 3.5mm hook and made tighter sc stitches so the brim would sit up a little, but still be floppy. The body is a simple beanie of dc with trb cables at the increases. I started the brim earlier than usual because the brim would hang down, and otherwise would cover the eyes too much.
20 month old Thomas wearing his flippy floppy hat for the Scarecrow song
After I sewed in the end, I popped it on my sons head and turned on his favourite video of the Scarecrow song by Justin Fletcher. The action shots were so action filled they were all blurry, but I managed to get this shot featuring the hat while he's watching his video and dancing along. Oh so cute!

Thursday, July 5, 2012

Yellow Draft Stopper

It must be about 7 or 8 years ago now that I made this yellow draft stopper! This was before I could read patterns so I just made this up as I went along.
an old draft stopper I made years ago when I was learning to crochet
The apartment I used to live on the north side of Brisbane over 5 years ago would get a nasty draft in winter from under the back door so I made this draft stopper. Its simply granny clusters, I remember I had to really rack my brain to remember what to do back then. Its basically a long skinny bag stuffed with old t-shirts and socks. This is one of the first things I made after returning to crochet as an adult, because my mum taught me how to crochet when I was a child. When I was a kid I used to make blankets and tiny rounds to use as handbags for my dolls. I also sewed clothes, which my mum also taught me how to do (thanks again, mum!).

I just found this old draft stopper after sorting out a box that's been sitting under my kitchen sink for 5 years! Isn't it amazing what you find when you're not looking??

Thursday, May 17, 2012

Tiny Yellow Herb Pillow

Here is another slip I made for one of the scented herb satchels I made last week. I used my 1.5mm hook and some fine yellow cotton my mum gave me.
tiny yellow slip for a herb satchel
I had a go at making a granny square like one I saw on pinterest. When I followed the link I couldn't find the pattern, so I just guessed it. Then I extended one of the sides of the granny square for another 11 rows. Then I folded the slip and started working on the opposite side of the granny square, extending that side for another 6 rows. Then I did a rounds of sc around the edge of the granny square, securing the folded sides. This forms a slip like a pillow case.
back detail of the tiny yellow slip
I was thinking of putting one of these in the package for a paying customer, but I've decided they're not nice enough for that! I'm going to keep these ones and product test them first.

Tuesday, May 15, 2012

Lion Slippers

For a bit of fun, I put these lion faces on the top of some slippers I bought as a birthday gift for a four year old! I should have had a go of making my own slippers, but I ran out of time as that would have taken me many hours to get right.
lion slippers for a 4 year old boy
I hope he likes them! ROARRR!!!
these happy lions have found a new home

Wednesday, May 2, 2012

Yellow edged Handkerchief

Thomas and I have been really sick with flu for the last month, David also got it but not as bad as he's had the vaccine. Next time I'm at the G.P. I'll be getting a flu vaccine, having the flu with a sick baby is Not Fun!
I'd misplaced this handkerchief and thought it had been thrown out because it's white, it might have been mistaken for a tissue. When I found it yesterday I decided to have a go at edging it so it will be less easy to loose. I used the petal edge pattern on page 87 of "Crocheting on the edge" by Nicky Epstein, and a 1.5mm hook and yellow cotton my mother gave me. For the 1st round I used my .75mm hook, I took one evening and a bit of a morning to complete this.
I'm not really thrilled with how it turned out, but I don't have a lot of time for something as frivolous as this, so this will have to do! I think it came out tight perhaps because my tension didn't match the gauge. It was a good exercise none the less, to learn something new. But next time I edge a handkerchief, I think I will try a more simple stitch.

Tuesday, May 1, 2012

Frog and Lion Faces

I'm fooling around with some ideas for kids, and came up with some animal appliqués. I'm wondering if they will look fun on a pair of socks or slippers?
lion and frog face appliqués
These were pretty easy, I just started with 12 dc in a magic circle, then a 2nd round of 24 dc. After that its easy to add ears. For the lions, I changed colour and added 5 ch behind every dc to form the mane. For the lion eyes and frog smile I crochet sl st in white. The frog eyes are a round of 12 dc. Finally I finished these with some embroidered black cotton. I'm thinking I need some embroidery lessons, as I need to get better at that!

I'm not quite sure what I'll use these for, but I suspect they may come in handy at some point!

Monday, April 2, 2012

Easter Bonnet for Barbie's friend

Here is an Easter Bonnet for a doll, which was heaps of fun to make.
Easter Bonnet for a doll
This is a Teresa doll, a friend of Barbie made by Mattel. I found this particular individual on sale about a year ago at the Rocklea Sunday market for $3. She was more expensive than usual because she was wearing a dress, a naked Barbie usually sells for only a dollar or two.

For this bonnet I used lemon 4 ply cotton and my 2mm hook. For the tiny flower I used some pink acrylic baby yarn, and the 2mm hook. I had a go at writing the pattern for this hat, but after talking it over with Dell, my crochet teacher, I've decided to spend some more time on it before I share it. Let me know if you would like it. I made a second tiny pink flower to go on the matching top.
Easter Bonnet and matching top
The other clothes in this outfit I made last year some time and have never blogged about them. I made the pretty yellow strapless top quite a while ago, and I'm very happy with it. There are no fastenings, it just pulls up over the waist. Its as small as it can be while able to do this, then the stitch on the torso caves in to give the doll a waist. I used my favourite stitch handed down to me by my grandmother for the torso and some yellow baby yarn.
Autumn accessories for an Easter outfit
The yellow and pink poncho I made last year as well, it was a bit fiddly to make but a bit of fun. Again I used 3 ply baby yarn and some fluffy craft yarn. The matching yellow pants I made recently by joining two folded granny squares. They are joined simply at the front like fishermen's pants using a drawstring. For the pants I used a 2mm hook and 3 ply acrylic baby yarn made in Australia.

With winter fast approaching, a poncho and pants are just what my Easter doll will need on a crisp Autumn day!

Sunday, January 1, 2012

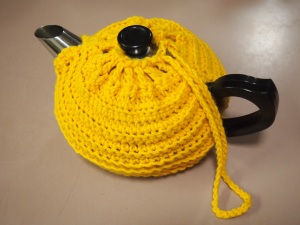
A Christmas Eve Tea Cosy

This is my first attempt at a tea cosy, and considering I didn't have the tea pot with me at the time to fit to measure as I went,  it turned out damned well!

It was pretty damn lucky this thing fit, but I did use a stitch that has a lot of stretch in it so it had a chance. I chose some nice soft acrylic my mum had spare and started with two rectangles of alternating rows of ridges. In hind sight, the ridges should have gone vertically instead of horizontally for even more stretch. This would increase the chance of the cosy being used for different tea pots. I chose the cheery and bright yellow colour, not only because it felt soft and would be nice to work with, but because it is a sunshiney happy colour for good luck, perfect for a family kitchen.

I was staring at the two rectangles wondering how to fix it all up as there were several options. In the end I opted to do a quick job with minimal fuss, with 1 dc 1 ch along the top for the ch pull handle. Next time this should only be 1 sc 1 ch to reduce heat loss. If I wanted to do a really good job, I could do two layers and sew them together with a 1 sc 1 dc lip, or maybe that would need the 1 dc 1ch lip, because it will be that much thicker. Also, there should be another row of dc above the lip, to further reduce heat loss. All good to note for the future, in case any one else wants me to make them a tea cosy.

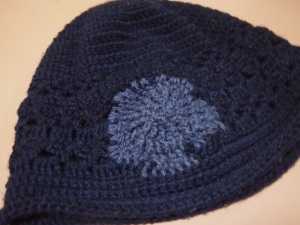
I whipped up this tea cosy on Christmas Eve while everyone else slept and I couldn't. It took me just under two hours, and I used either my 3.5mm or 4mm hook. On Christmas day I did a free form patch on my brother's damaged beanie, I just used some blue that was on hand, it doesn't match very well but I'm sure it doesn't matter as this beanie is bound to end up in the bin. It was very tricky, especially as I've never done it before, but because I am so clever I did an absolutely awesome job!! I can not for the life of me imagine why anyone would think it was ok to take to an especially made custom crochet beanie with a pair of scissors to rig up a tea cosy, but truth is stranger than fiction it seems. Thanks for taking some time to read my blog.

Saturday, October 8, 2011

Colourful Scrap Rug for a Toddler

This rug started off as a pile of scraps given to me by my mother last year, and is now the second rug like this I've done. I'm hoping it will be a useful rug for Thomas.

I really enjoy making these rugs. The material is not expensive, you can pick it up at op shops or find it in your own craft cupboard, and it's satisfying to turn balls of left over yarn into something that can actually be used. I enjoyed making the first one so much I called it a 'therapy rug'! There's no pattern to the colours, the only rule is whenever I change yarn it's a different colour to the last. It's therapeutic because there is no stress at all about the design, it just comes down to a decision at the moment it's time to pick a new colour.  And the idea of these rugs is to use up all of that left over yarn, that's why there are not finished rows, rather they run into each other like spirals until the yarn runs out. Then I choose a contrasting colour to continue. This way there are no little bits left over at all.  That's why this is much better than making a rug out of small granny squares sewn together. And I find sewing all those squares together at the end very tedious! For this rug, I used a 4.5mm hook, so not too small so it doesn't take too long.

The first thing to do is sort the balls of left over yarn according to size. The very smallest ball of yarn is the one you want to start with, next choose a contrasting colour that looks to be amongst the smallest of the balls left. I've even resorting to weighing the balls on a small kitchen scale! This way you get the spiral effect. I'm rather proud how this one turned out, the pattern is quite nice considering there was little planning in it. It's good to know I have something useful to do with all those annoying left over balls of yarn!

Tuesday, March 15, 2011

Homemade Quilt for Thomas

On the weekend, we got a visit from Nanna and Poppy (David's dad Brian and his wife Freya) and they came with many gifts, including this special handmade quilt for Thomas!

How very special this quilt is, including a lively print of playing frogs and a print of blue hearts. I'm sure this quilt will get some use, probably in the cot as it's a bigger size than a bunny rug. Freya is very good at making lovely quilts. I think they would be too tricky for me to try, whenever I cut material it always comes out wonky. And once you cut it you can't save the material. That's why I like to crochet, any mistakes I make I can just undo and retry. I guess everyone gravitates towards the crafts that suite them the most.

Besides the quilt, Nanna and Poppy also brought a lot of fresh produce from Stanthorpe, including these tomatoes and zucchinis home grown in their very own garden. We've already eaten some in the few days since their visit, but I'm a bit worried that some might waste there is so much! They also gave us several jars of home-made pickles, again using fresh veggies from their garden. It must be so satisfying to eat from your own garden. I know it is and our own garden only has herbs and a lime tree!

They also brought this lovely posey of roses from their garden, now my kitchen smells like roses again! It's a pity they live so far away, it's a long three hour drive one way. Hopefully we'll see nanna and poppy again before too long.

Tuesday, January 11, 2011

Three Small Things - baby beanie, dishcloth, headband

small sea green beanie for a premmie
Here are another three small things I've completed in the last couple of days, a baby beanie, a wavey dishcloth and a crochetted headband.

I bought some yarn made from the Wangaratta Mill Shop , part of the Australian Country Spinners, that Lincraft had on special. I'm wanting to find some locally grown and spun yarn, hopefully this is what I've been looking for. I really liked this sea green colour and made a beanie for Tom with it. I used a 4.5mm hook and used front post ridges to mark the increases in the crown, then plain down the sides, and finished of with some star-fish looking clusters. I wonder if the nurses will use this beanie? My starfish cluster pattern goes something like this ... ch 1, [sk 1 st, (htrb, trb, d-trb, trb, htrb) in next, sk next, dc in next] * repeat to end

wavey yellow and green dishcloth
I've been meaning to make something with this wavey stitch for quite a while and have never gotten around to it. The cotton I used for the pentagon dishcloths was so nice, I decided to use the last of it up to make this cloth, which I might use as a dust cloth for my piano. There are references to this wavey pattern in many places, in the end I used one at eHow. I used a 3.5mm hook for this cloth.

I'm really proud of this new headband, this is the first time I've made something like this. I only have one headband, made out of black t-shirt material, and I am so very over black that I need a different colour! So I gave this one a go, using a 3mm hook and some greyish-lilac cotton I bought and still haven't used until now. I found the pattern after searching google for 'stretchy crochet headband pattern'. My pattern is based on this but it is different as I turned for every row.
crochet headband
My version of the stretchy headband pattern
1. ch 8, dc (US sc) in second ch from hook, dc in every ch to end (7 dc), turn
2. ch 1, dc in first dc, dc in second dc, ch 3 skp next dc, dc in next dc, ch 3 skp next dc, dc in next dc, dc in last dc, turn
3. ch 1, dc in ea next 2 dc, dc in 3 ch sp, ch 3, dc in next 3 ch sp, dc in ea last 2 dc, turn
4. ch 1, dc in ea next 2 dc, ch 3, dc in 3 ch sp, ch 3, dc in ea last 2 dc, turn
repeat round 3 & 4 until desired length is reached for firm fit
last round. ch 1, dc in ea next 2 dc, dc in 3 ch sp, dc in next dc, dc in next 3 ch sp, dc in ea last 2 dc
sl st to other end to form ring

Friday, January 7, 2011

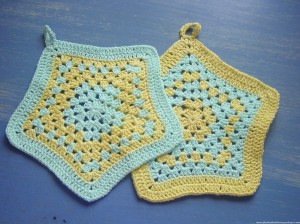
Pentagon Dishcloths

I feel a need to keep my hands busy right now, I'm not sure but this might be the 'nesting' kicking in. It's hard when I'm not 100% physically, so I've resorted to making dishcloths while I wait for my body to catch up!


<<< I did up this pentagon dishcloth quickly, using a 4mm hook and my own pattern from the top of my head. This dishcloth got put to work immediately in the kitchen after it had it's obligatory photograph taken! This dishcloth has 4 rows of granny clusters then 3 rows of trebles (US dc).


>>> Recently I did these pair of pentagon dishcloths, using the same pattern as my 1st one except I skipped the picot edge. The second pair has 7 rows of granny clusters and 2 rows of trebles. For these I used a 3mm hook and some finer cotton my mum gave me. I like the colours, I think they are perfect for a cheery kitchen!

Friday, December 31, 2010

To catch a dream (three small things)

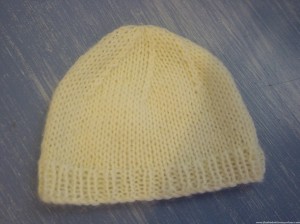
The last two weeks have been surreal to say the least, like a walking dream or day-mare. Some thoughtful soul gave this special beanie to David to give to me, it's what Thomas was wearing in the photo that was taken on his first day. Someone even printed up the photo so I could have it in my room. I didn't see Tom until the second day as I left the ICU to go to the maternity ward. I clung to this special little yellow beanie during my stay while I was away from my baby, I even imagined it smelled like him! I give thanks to the person who made and donated the beanie, and to the person who took the photos of Thomas wearing it, and also to the person who thought I might like to keep it when our baby went into the humidicrib and no longer needed to wear a beanie.

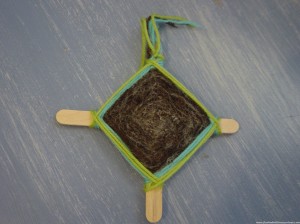
While we were in the maternity ward, on the meal tray was a paddle pop stick. We guessed they were meant to be for stirring tea and coffee, which we thought was a waste of wood. Imagine throwing all those not needed paddle pops away? What a waste of trees! So I collected a few and made some into dream catchers to pass the time. When we left the maternity ward and David went home to sleep, I told him to take the brown dream catcher to place above his bed. It is meant to be for good luck in catching your dreams so they can come true. I learnt how to make these from school, you just weave wool in and out, around the sticks.

Sunday, December 5, 2010

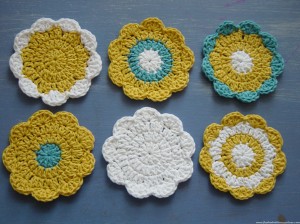
Summer Drinks "Frangipani" Coasters

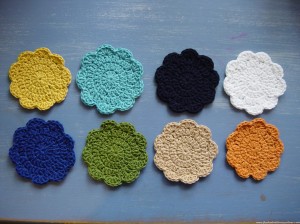
This is the last coaster set I'll do for now. I guess if anyone else wants one, I'll just get some more cotton and make more! But next time I buy cotton, I'll get some red, pink and purple so I can get different colour combinations. Below is a photo of the colours I used for this gift giving season.

It's fun to think of a name, a scene or season to match the colours and vice versa. I have done this last set because these three colours to me say 'frangipani' and I had enough of these colours left over. When I lived in Darwin there were a lot of frangipani trees about. They would loose all their leaves in the dry season, which is the north Australian equivalent of winter, but it really doesn't get very cold at all. Then as the wet season approaches, the trees would become full of flowers and the smell was gorgeous. Most of them were the yellow and white variety, some had a light blush of pink. And very rarely, there was a deep red variety which didn't seem to grow as thick but had the rich fragrance of a rose and was very special. The blue in this set represents the clear blue skies of the Darwin dry season.

I do not recommended this coaster set for red wine drinkers, as it's mostly white and yellow. If you spill red wine on these, soak in cool water immediately. Here are some more tips on how to remove red wine stains from cotton.

Next, to make some Christmas decorations and practice baking some home-made treats to share as gifts!

Wednesday, August 4, 2010

Easy Yellow Doily

When I got my regular message from Crochetspot this pattern was highlighted so I decided to give it a go. It was called a beginners doily and I whipped it up one Sunday morning, finishing it before lunch.The pattern for this easy doily is at Crochetspot. http://www.crochetspot.com/crochet-pattern-hipster-doily/

I don't know what I'll do with this doily, I just made it because I was bored! I like how the clusters in this one look more like triangular sun rays rather than rounded flower petals.

<3 <3

Thursday, July 22, 2010

Four Little Lost Angels

As I was taking them home from the market, I knew I would have so much fun cleaning up these second-hand dolls and dressing them in new crochet outfits, perhaps even with angel wings! In the end I settled on summer dresses complete with pretty bonnets and mary jane slippers. These tiny Kelly dolls are just 4.5 inches tall.
pretty outfits for four Kelly dolls
I first found the little blonde in a washing basket full of toys. The stall holder was busy selling a set of Dora dolls, so when I said I would like the tiny doll, she dismissed me saying I could have it for free. Well, I wouldn't take something so special for free, it just wasn't right! Her hair is in excellent condition, and she even has two near new shoes. I was thinking to give a dollar, but when we looked in David's wallet a 50 cent coin was sitting on top so I grabbed that and pressed it into hand of the man that was helping her with the stall. I think it must have been Karma, because later on at another stall, I saw the three other dolls, all with different coloured hair and all just 50 cents each! It was so uncanny it must have been fate that these four tiny Kelly dolls should meet in this way!
how I found these 4 dolls at the market for 50 cents each
Crochetting some clothes for these dolls turned out to be a lot more challenging than I first anticipated. I made several attempts before I ended up with a dress I was happy with. At first, I did a smaller version of the Barbie doll dress I usually do, using baby yarn, but I decided the result looked too bulky. Later, I made matching knickers for that dress using a free pants pattern I found on an old blog, again using the baby yarn. I made a top using baby yarn and a free ruffle top pattern, but I did not use the right size hook and yarn, and it didn't fit. The problem was, I was using baby yarn when I should have been using fine cotton thread.

At first, I really didn't think I would need to follow a pattern for this project, but I did. I had a little success with a free dress pattern @ Crochet Crafts by Helga, using fine cotton and 1.5mm hook as recommended. But I didn't like the skirt, I thought it was too short so added more rows, which then made the result bulky. Finally, I made a dress I liked using the bodice from Helga's free pattern, but adding my own skirt. Using the same cotton, I made some panties using Helga's free pants pattern,shortening the legs by making just one row of sc. I stitched up the gap at the back of the pants as I don't think it needs a button, pull on pants are fine for this small doll. I then made matching pull on panties for the other dresses I made, one each of pink, green, apricot and yellow. Each dress has one button on the back of the bodice.
matching beach outfits for four Kelly dolls
Because you can't see the panties underneath the dresses, I decided the dolls needed some little tops to show them off! Maybe these outfits can be PJs or summer beach outfits? The tops are just the bodice part of the dress, with every stitch in the bottom frill incr. The tops looked a little plain, so I crochet a tiny heart, clover, flower and sun to attach in contrasting colours to the front, to make them look more fun (hopefully!). The flower is just clusters to form 5 petals, and the sun is a round of 15 trbls, with a 2nd round of a picot in every 3rd trbl. I used the heart and clover patterns explained in previous posts.

Then I made them all matching Mary Jane slippers with my own made up pattern.

Mary Janes for Kelly Dolls by Teena Sutton
using 1.25mm hook, fine cotton
1. ch 7, trb (US db) in 3rd ch from hook, 2 trb, 2 db (US sc), turn
2. ch 2, trb in next 5 trb, 3 trebles in the stitch space at the toe, go round to the other side of the shoe and do trb in ea 5 trb, 1 trb at the heel, sl st in 1st trb of this round
3. ch 2, db in next 2 trb, sk 2 trb, trb in next 3 treble to form top of toe, sk 2 trb, db in next 3 trb, sl st in 1st db  of this round
4. ch 8 to form ankle strap and sl st in 1st ch
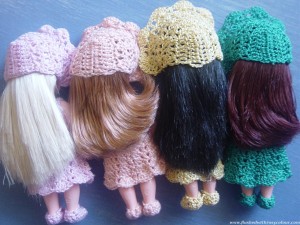
after some hair care the bonnets fit perfectly
Finally, I finished the outfits with bonnets, again with a pattern I made up myself. When I found these dolls, their hair was mostly 'fly-away' and a real mess. After shampooing, conditioning, air drying and finally smoothing with baby oil, their hair came up very nicely indeed. The pretty bonnets help keep the hair in place.

Pretty Bonnets for Kelly Dolls by Teena Sutton
using 1.25mm hook, fine cotton
1. chain 10, trbl (US dc) in 3rd ch from hook, trb in ea next 6 ch, 5 trbl in last ch which is the bottom of the last trbl, trb in the bottom of the other 7 trbl, turn
2. ch 2, trb in ea trbl, extra 3 trbl in last trb, trbl in bottom of each trb, turn
3. ch 2, sk trb, (3 trb in next trbl, sk trb, trb in next, sk trb) twice, 3 trbl ea in next 3 trbl (9 trbl), sk trb, trbl in next trbl (sk trbl, 3 trb in next trbl, sk trb, trb in next) twice, turn
4. ch 2, (sk trbl, 3 trb in next trbl, sk trbl, trbl in next) thrice, 3 trbl in next, trbl in next, (sk trbl, 3 trb in next trbl, sk trbl, trbl in next) thrice, turn
5. ch 2, repeat (sk trbl, 3 trbl in next, sk strbl, trbl in next) seven times, each cluster of 3 is in centre of cluster below, turn
6. repeat row 5 except don't turn, ch about 12 or enough to be long enough to form the chin strap, measure, slip stitch into the other side of the bonnet to form chin strap, don't turn
7 (bonnet frill), ch 2, repeat the pattern from previous row, except each cluster has 5 trebles instead of 3, turn
8. ch 2, repeat the previous pattern, except each cluster has 7 trebles instead of 5, fasten off.

Making outfits for these four Kelly dolls was heaps of fun and very satisfying. I learnt more about adjusting patterns for size, and also how to make pants. These are such a joy - but I think they will be going in a box soon. One day I'll bring them out again as a special treasure.

This is my post for this week's Transformation Thursday hosted @ The Shabby Chic Cottage. Be sure to check out fun crafty stuff at this blog party!

Friday, June 11, 2010

Winter Hat Collection 2010

Here is a gallery of all the hats and beanies I've finished so far!

I'm hoping to give some of these to family as gifts, I just don't know which ones they would like so I hope they can tell me! <3 <3 <3

I have already written on my blog about some of these hats, but I'll be posting more in future, explaining how I made them, the pattern and washing instructions for the wool.

[gallery columns="5"]
Related Posts Plugin for WordPress, Blogger...