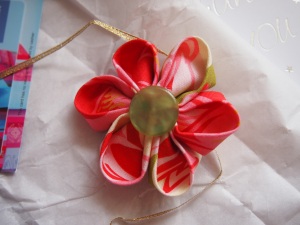
This just arrived in the mail, a special handmade gift from Ronda, an old friend of my mother's!
Ronda saw a photo of the first tea cosy I ever made on facebook and asked me to make her one, so I made her one and posted it to her. My second go at a tea cosy was a bit fancier, it was a reversible two way tea cosy with a Lady Grey side, and a Ladybird side. Ronda liked it so much she sent me a present back, which included her home made flower brooch!
How sweet, now I just have to find a special place to put it. I'm thinking my favourite sun hat could do with an embellishment like this!
Showing posts with label buttons. Show all posts
Showing posts with label buttons. Show all posts
Sunday, January 29, 2012
Sunday, November 28, 2010
Pretty Irish Rose for a Sunhat
 I had a go at adding a flower to the child's sun-hat I made the other day, using a tradition Irish Rose pattern. I think the end result is very cute, if I do say so myself!
 I wasn't sure how the colour changes would go, but it worked out fine. I changed colour after doing the back posts and chain foundations for the next row. I made a 6th petal, although the pattern I followed had 5, as I prefer it this way. A couple of buttons added to the centre provided just the right amount of embellishment. I'm glad a couple more of my homeless buttons have found a new home. This flower is not removable like my other flowers I make for hats, I just sewed it right on securing it tightly.
I wonder if my 4 year old niece would like this hat? I don't know anyone else this would fit, and it would be a shame if no one wore it, it's just too nice!
Labels:
buttons,
Crochet,
crochet flowers,
hats,
homemade clothes,
pink,
purple,
white
Saturday, September 4, 2010
Purple and White Stripes Baby Jacket
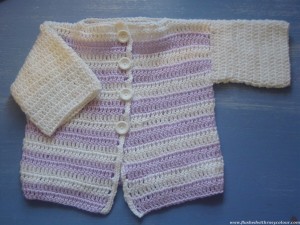 How many of these things am I going to need? I do not know, but I just feel like making a bunch!
My baby is expected in summer, so I really don't know how many of these will be worn if at all! I guess if they don't get used they might make nice gifts for someone else. The jackets I've been making are different sizes, so maybe some will fit for the first winter. I've already started on my next baby jacket which is white!
This one was easy and boring to do. If I use this pattern again, I'll try and use a more interesting stitch. I think the stripes saved me from absolute monotony! This simple baby set pattern comes from the Lion Brand Yarn website, to access their free patterns all you have to do is register. This is the same site I got the baby socks pattern from.
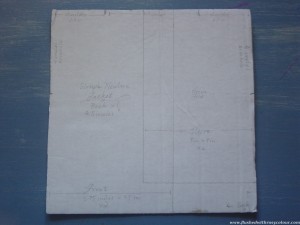 I drew up this simple pattern on a square piece of card. This way I could do it while watching tv, when I prefer not to have to read patterns. The square board is as big as the back of the jacket, and I've made markings for the sleeves and front sections. This pattern really was very straight forward and easy, all you have to do is make 5 rectangular shapes and sew them together. But instead of making up the sleeves separately, I just worked them right onto the made up vest in rounds.
 I used my left over purple and white dimples yarn from Lincraft, I think I used the 4mm hook. I chose some very cute recycled flower buttons, and gave them a quick scrub with Earth Choice detergent and a recycled toothbrush so they came up just like new.
Although this is newborn size, it looks a bit bigger than that to me.
<3 <3
Sunday, August 22, 2010
Green Hexagon Baby Jacket
 I'm quite pleased and surprised this one turned out so cute!
I used some green craft wool my mum gave me for my birthday, I've got quite a lot of that colour left. The darker green was a small amount I have in my scraps bag, as was the white. I'm not sure if that dark green is real wool so I'll have to wash this one carefully, which might turn out to be too inconvenient later on. But this jacket was a bit of a 'practice' item for me to try, recycling some old buttons that I think look really cute, so making this jacket turned out to very thrifty and frugal indeed!
I used the hexagon jacket idea which I've tried before. I've since found another blog that explains the hexagon jacket pattern in more detail, I did the bottom edging and collar following that blog's pattern. The 11 rounds of green used 60g from my 100g ball of craft wool.
Even if this jacket doesn't fit my baby, it will be cute for a toy teddy to wear!
<3 <3
Thursday, July 22, 2010
Four Little Lost Angels
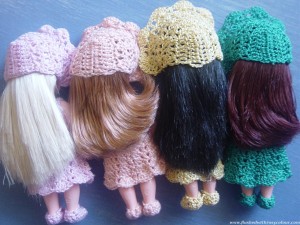
As I was taking them home from the market, I knew I would have so much fun cleaning up these second-hand dolls and dressing them in new crochet outfits, perhaps even with angel wings! In the end I settled on summer dresses complete with pretty bonnets and mary jane slippers. These tiny Kelly dolls are just 4.5 inches tall.
 |
| pretty outfits for four Kelly dolls |
I first found the little blonde in a washing basket full of toys. The stall holder was busy selling a set of Dora dolls, so when I said I would like the tiny doll, she dismissed me saying I could have it for free. Well, I wouldn't take something so special for free, it just wasn't right! Her hair is in excellent condition, and she even has two near new shoes. I was thinking to give a dollar, but when we looked in David's wallet a 50 cent coin was sitting on top so I grabbed that and pressed it into hand of the man that was helping her with the stall. I think it must have been Karma, because later on at another stall, I saw the three other dolls, all with different coloured hair and all just 50 cents each! It was so uncanny it must have been fate that these four tiny Kelly dolls should meet in this way!
 |
| how I found these 4 dolls at the market for 50 cents each |
Crochetting some clothes for these dolls turned out to be a lot more challenging than I first anticipated. I made several attempts before I ended up with a dress I was happy with. At first, I did a smaller version of the Barbie doll dress I usually do, using baby yarn, but I decided the result looked too bulky. Later, I made matching knickers for that dress using a free pants pattern I found on an old blog, again using the baby yarn. I made a top using baby yarn and a free ruffle top pattern, but I did not use the right size hook and yarn, and it didn't fit. The problem was, I was using baby yarn when I should have been using fine cotton thread.
At first, I really didn't think I would need to follow a pattern for this project, but I did. I had a little success with a free dress pattern @ Crochet Crafts by Helga, using fine cotton and 1.5mm hook as recommended. But I didn't like the skirt, I thought it was too short so added more rows, which then made the result bulky. Finally, I made a dress I liked using the bodice from Helga's free pattern, but adding my own skirt. Using the same cotton, I made some panties using Helga's free pants pattern,shortening the legs by making just one row of sc. I stitched up the gap at the back of the pants as I don't think it needs a button, pull on pants are fine for this small doll. I then made matching pull on panties for the other dresses I made, one each of pink, green, apricot and yellow. Each dress has one button on the back of the bodice.
 |
| matching beach outfits for four Kelly dolls |
Because you can't see the panties underneath the dresses, I decided the dolls needed some little tops to show them off! Maybe these outfits can be PJs or summer beach outfits? The tops are just the bodice part of the dress, with every stitch in the bottom frill incr. The tops looked a little plain, so I crochet a tiny heart, clover, flower and sun to attach in contrasting colours to the front, to make them look more fun (hopefully!). The flower is just clusters to form 5 petals, and the sun is a round of 15 trbls, with a 2nd round of a picot in every 3rd trbl. I used the heart and clover patterns explained in previous posts.
Then I made them all matching Mary Jane slippers with my own made up pattern.
Mary Janes for Kelly Dolls by Teena Sutton
using 1.25mm hook, fine cotton
1. ch 7, trb (US db) in 3rd ch from hook, 2 trb, 2 db (US sc), turn
2. ch 2, trb in next 5 trb, 3 trebles in the stitch space at the toe, go round to the other side of the shoe and do trb in ea 5 trb, 1 trb at the heel, sl st in 1st trb of this round
3. ch 2, db in next 2 trb, sk 2 trb, trb in next 3 treble to form top of toe, sk 2 trb, db in next 3 trb, sl st in 1st db of this round
4. ch 8 to form ankle strap and sl st in 1st ch
 |
| after some hair care the bonnets fit perfectly |
Finally, I finished the outfits with bonnets, again with a pattern I made up myself. When I found these dolls, their hair was mostly 'fly-away' and a real mess. After shampooing, conditioning, air drying and finally smoothing with baby oil, their hair came up very nicely indeed. The pretty bonnets help keep the hair in place.
Pretty Bonnets for Kelly Dolls by Teena Sutton
using 1.25mm hook, fine cotton
1. chain 10, trbl (US dc) in 3rd ch from hook, trb in ea next 6 ch, 5 trbl in last ch which is the bottom of the last trbl, trb in the bottom of the other 7 trbl, turn
2. ch 2, trb in ea trbl, extra 3 trbl in last trb, trbl in bottom of each trb, turn
3. ch 2, sk trb, (3 trb in next trbl, sk trb, trb in next, sk trb) twice, 3 trbl ea in next 3 trbl (9 trbl), sk trb, trbl in next trbl (sk trbl, 3 trb in next trbl, sk trb, trb in next) twice, turn
4. ch 2, (sk trbl, 3 trb in next trbl, sk trbl, trbl in next) thrice, 3 trbl in next, trbl in next, (sk trbl, 3 trb in next trbl, sk trbl, trbl in next) thrice, turn
5. ch 2, repeat (sk trbl, 3 trbl in next, sk strbl, trbl in next) seven times, each cluster of 3 is in centre of cluster below, turn
6. repeat row 5 except don't turn, ch about 12 or enough to be long enough to form the chin strap, measure, slip stitch into the other side of the bonnet to form chin strap, don't turn
7 (bonnet frill), ch 2, repeat the pattern from previous row, except each cluster has 5 trebles instead of 3, turn
8. ch 2, repeat the previous pattern, except each cluster has 7 trebles instead of 5, fasten off.
Making outfits for these four Kelly dolls was heaps of fun and very satisfying. I learnt more about adjusting patterns for size, and also how to make pants. These are such a joy - but I think they will be going in a box soon. One day I'll bring them out again as a special treasure.
This is my post for this week's Transformation Thursday hosted @ The Shabby Chic Cottage. Be sure to check out fun crafty stuff at this blog party!
Thursday, July 8, 2010
Purple Baby Jacket and Hat
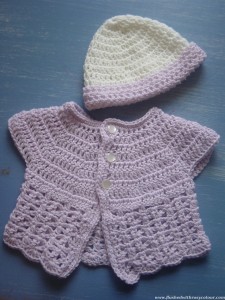 This was an easy jacket I made following a pattern David's sister Michelle got free for me from Spotlight, the hat I made using an easy pattern from Lincraft.
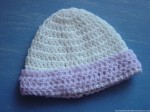 The hat was the first of these that I made using a pattern from the Lincraft booklet I bought some months ago. I then had a go at the matching jacket but I just couldn't make sense of what the pattern wanted me to do. My M.I.L had a look at it for me and tried to explain but in the end I decided it was harder than it deserved, so I gave up and had a go at the pattern from Spotlight, which made more sense to me.
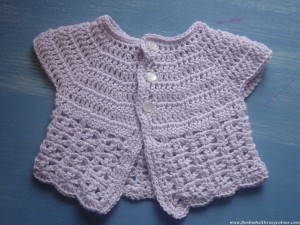 For the jacket, I used more of the purple dimples baby yarn from Lincraft, this pattern required a 4mm and a 4.5mm hook. It's a straight forward pattern and now I know how to do it, I'm sure I could make more variations of it. I really like the stitch in the skirt, so much so that I'm also working on a scarf using the same stitch. I think it looks like a pretty flower or star pattern. The buttons are recycled from my old stash and I think they suit perfectly! The pattern has sleeves, and also says to thread a ribbon around the waist, which I can choose to do later if I wish. For now, I think this is ok!
Perhaps I need to have a go at the booties ?
<3
Wednesday, June 23, 2010
A White Dress for Barbie
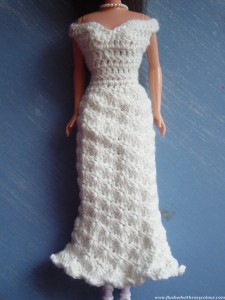 I'm very surprised how this turned out, how could it be that the bodice of this dress fits so perfectly? This is my post for White Wednesday which is hosted by Faded Charm. I'm also putting this in for this week's Transformation Thursday hosted @ The Shabby Chic Cottage.
 I used white dimples baby yarn from Lincraft, that's their cheapest baby yarn and it costs $1.99 for 50g. I started with the bodice as usual with all of these dresses I make, working up from the waist. When I got to the cleavage area I attempted a sweet heart neckline. I have attempted this before on a top I've made but undid it as it didn't work out. This time I did it over two rows and I am totally amazed at how perfectly it sits, I was certain it would be a little wonky.
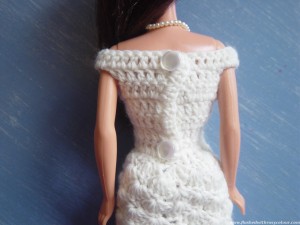 The skirt is the 5 cluster separated by english doubles in the cluster below pattern which I saw in a picture of a Barbie doll wedding dress, although that's the only thing I used from that pattern. I didn't plan for the skirt to be this shape at all, it just kind of happened. I forgot to increase more before starting the shell pattern so the skirt is more fitted at the top, so then I flared out at the bottom. It was nice
 but it needed something more so I finished off with a row of picots, and low and behold, they really wanted to sit up in the air like that! It kind of looks funny but it is a 'white dress' after all, so they are kinda of required by law to look a bit frilly and silly!!! lolzzz
I have many white buttons and I knew I wanted the one holed pearl kind, but the only ones I could find in my stash were a little too big or had peeling polish so I actually bought these buttons new /gasp! That really is naughty for a doll's dress isn't it? I got some really cheap ones and there are plenty left over to use on other things, so I figure I'm not toooo bad!
 The last thing to do was to make something white for her hair so I just whipped this thing up. It's simply a row of English trebles (US dc) to allow room for ribbon to be threaded through, then some shells like the skirt on top of that.
 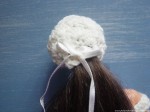 I didn't really know what I was making, this kind of just happened! I threaded the ribbon through then around again to form a loop that the hair could go through. Tying it tightly keeps her flyaway hair in place and every bride needs a little something white on the head, don't you think?
<3 <3
Be sure to check out other pretty whites @ White Wednesday!
My favourite highlight from this week's White Wednesday
- another beautifully embroidered baby dress @ The Old Fashioned Sewing Room
Check out lots of cool & crafty ideas @ Transformation Thursday!
I checked every participant this week for this blog party as I always find so many useful posts. Here are some of my favourites.
- make home-made wood polish @ Nancy's Tidbits
- chalkboard top desk @ Twice Lovely, chalkboard labels @ The Scrap Shoppe, reuse the back of a photo frame chalkboard @ Keeping it Simple, old chalkboard makeover @ My Magic Mom
- ideas for home-made kids clothes @ Little Lizard King
- no glue stretchy button headband @ Love Stitched, cute girls dresses @ The Train to Crazy
- how to cut up a watermelon @ The Pumpkin Patch, jello rockmelon @ How Does She?
- home-made beauty products like parsley toner @ Homemade Mamas
I also found these Ten Parenting Tips @ Real Parenting Tips
- Read to your children.
- Have the courage to say “NO!” at times.
- Create meaningful family traditions.
- Make home a place where your children want to be.
- Have Family Dinner every night.
- Teach your children to work – and work with them.
- Support your child’s interests.
- Talk with, not at your children.
- Listen.
- Say “I love you” often.
Thursday, June 3, 2010
A Set of Small Purses
 This set began with a shell pouch I made for my mum to say thank you for teaching me how to crochet. Now the set has grown to include more purses! This is my post for this week's Transformation Thursday which is hosted by The Shabby Chic Cottage. I transformed a ball of lovely and soft multi-coloured wool into these purses.
 I made the tiny purse without a pattern. I again used the shell pattern for one side then plain for the other so the shape would not turn out wonky. I then made a lid for the purse. I was inspired by the lid on the quick clutch at Crochet Spot but I did not follow the pattern. If I did I probably would not have had to pull it apart two times before I got it right on the third try! I also made up my own tiny button, although I might replace it with a proper button if this doesn't work out. This tiny purse took one morning to do.
 I completed the tissues cover over two days without using a pattern. I had been planning to make one with a slit down the middle but then I saw the tissues I had bought for this opened a different way. I made this tissue purse using the shell stitch on the front only and plain treble crochet on the back and sides so it would keep it's shape. I had trouble deciding if I would make a lid for it, but settled on leaving it open because the shell stitch made a nice wavy edge.
I gave these and the matching tiny dancing teddy bears to my mum yesterday when she came to visit. She said she likes the set, and promptly put her pens in the larger pouch to stop them from rolling around in her bag! The tiny teddies fit neatly inside the tiny purse, they were so cute!
Be sure to check out the other things linked in with Transformation Thursday, there is always HEAPS of handy home-crafting ideas which I love to check out!
<3 <3 <3
My Highlights from this weeks' party
- sew star pin cushions or beanbag toys @ Sew a Straight Line
- recycle old jeans and pants into aprons @ Keeping it Simple
- turn a child's t-shirt into a dress @ I Can Find the Time
- make a simple memory game using stamps and wood cutoffs @ A Bit O' Shine
Thursday, May 27, 2010
Simple Brown Handbag
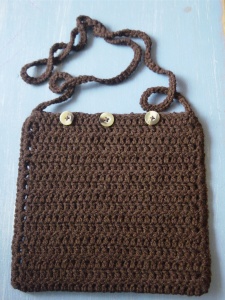 I've quickly made up another chocolate-coloured handbag in case my sister doesn't like the other brown bag I made for her. This is my post for Transformation Thursday at The Shabby Chic Cottage. The materials transformed for this was about 50g of yarn and three buttons. Using a 3.5mm crochet hook it didn't take long at all, maybe one afternoon.
I was speaking to Jen last week and she mentioned she needed a little handbag just big enough to hold a couple of things so I've made another bag a little bigger than the last with a longer handle. This bag has a handle long enough that when on the shoulder the bag will hang down by the waist. I used a simple stitch, instead of the shell stitch I used in the first brown bag which made it a little wonky, so this was quicker to make.
By the way, I found out at the craft group I went to last week that the stitch I've been calling 'double crochet' is American for the UK stitch called 'treble crochet', which is the stitch I used mostly here. I'm thinking I will need to learn both crochet languages so I know the two names for each stitch. There are so many free patterns on the internet that are in American crochet, but my mother and the local craft group use British crochet, so it's best I know both!
Here's to hoping my sister likes at least one of these bags!
So MANY Fantastic Ideas at this weeks party, some day I'd really like to try these ones...
- recyled baby clothes made into a child's quilt @ Mother Lode
- recycled wine corks notice board @ I Can Find The Time
- recycled spice rack craft organiser @ Real Housewife in Minnesota
- child's number beanbags @ Lemon Tree Creations
- baby wrap if anyone in my life might have a need for that @ Canadian Rhapsody
- recycled old makeup child's toy @ Simply Designing
Monday, May 10, 2010
Cute, Small Brown Handbag
 I'm really quite proud of how this turned out in the end, if I do say so myself!
At first I was worried how wonky it was, marrying up the edges evenly was a challenge. But because it was off-centre I was able to place the button enough to the side to appear intentional, and I think the result is rather cute. I had several cute buttons to choose from as usual, all would match nicely, but I settled on the pearly tan coloured one.
When I told my sister Jenny that I could crochet simple handbags, she said she'd like one in 'earthy brown colours', hence why I chose this wool and button. I really hope she likes it because I made it with love and care, although I know it's highly likely the first thing she'll say will be to point out an imperfection. But you know sisters can be like that, hey? I used the shell stitch described in my Shell Crochet Pouch post, I just made it larger and added a handle, which was rather easy and fun!
Sunday, May 9, 2010
Shell Crochet Pouch
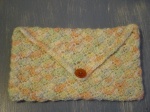 I just made this modest crochet pouch because I thought the shell stitch was very pretty, and liked the multi-colours in this wool which shows off the stitch better than a mono-colour. I have also started making a brown pouch for my sister because she asked me to make her one, and thought to make the stitch a little interesting so had a go at this shell stitch. Its kind of like this one here, but I did it off the top of my head at the time so it's different.
One row of this shell pattern takes two rows to complete. It goes something like this ...
start with a chain with length equal to pouch width
row 1 - (ch 2, 2 dc in 1st ch sp, sk 2 ch sp, sl st) to end, turn
row 2 - ch 2, 2 dc in 1st ch sp (sl st in top of shell in row 1, 3 dc in sl st in row 1) to end
 I wonder if my mum would like this as a gift? She has so many lovely things, its very hard to find nice gifts for her. But mum was my very first crochet teacher. Thanks to her early lessons, I was I able to pick up a few pointers from youtube videos when I started hooking again in recent years. Hopefully she likes my simple gift as a thankyou for all the handicrafts that she taught me. I had several pretty buttons to choose from, and settled on the burnt orange one with a lovely shell-like shine to it.
I hope I get a chance to see mum soon so I can give it to her to say thanks!
Wednesday, March 31, 2010
Dress for a Special Teddy
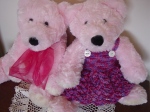 This pair of teddy bears are very special to me, I've had them for nearly two years now.
I knew I wanted to get my grandma something soft and pink, hopefully something that could bring her at least a little bit of comfort. David found one and I loved it straight away, knowing it was what I needed to give her. I put a big, bright pink ribbon around it's neck. It was a hard time for my family, David took me back to the newsagent and bought me another one. When my nanna passed away, I was given the option to look after her teddy so chose to keep the pair together.
I recently made a dress for one, it was very easy. I might make another one in a different colour for the other teddy. I simply made a circle chain with a circumference as wide as the chest, rows of single crochet make up the bodice. Then I used a shell stitch for the skirt. Last to do was 2 shoulder straps leaving holes for the buttons, and sewing on the prettiest buttons I could find that would suit. I chose ones with a nice shell texture.
It might be fun to make a frilly pair of underpants to go under the dress, if I ever get around to it.
Wednesday, February 24, 2010
Pretty Covered Coathangers

 Every wardrobe is not complete without a few of these covered coathangers! I don't know why I haven't made these before, they are so easy.
Many years ago I replaced all the old coathangers in my cupboard with plastic ones. But you know how these things multiply, right? Somehow, I now have three old wooden hangers in my cupboards and I'm not sure how they got there! They really needed covering, the wood catches on delicate clothes, and the corners leave imprints in the shoulders. Covering them fixes that!

 I searched around on the net for ideas on how to do it, but they all seemed a bit too fussy. For mine, I just cut up some recycled foam packaging and secured it with elastic bands. Then I simply hand stitched the pretty material straight over the top, folding in the edges, using blanket stitch. I folded in the ends and stitched that down, too. The lavender ones have pretty white buttons to secure the ends. I then finished off with a very simple little bow to cover the tiny gap for the hook. These are a cinch and don't take long to make at all.
Saturday, February 20, 2010
Hexagon Jackets
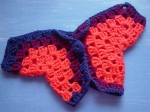
I saw this baby's hexagon jacket at Crochet Soiree and thought it was so cute and might be fun to try, even though there isn't anyone in particular for me to be making it for!
I didn't follow a pattern, just made a couple of hexagons and joined them together. The orange and blue one was my first try, which wasn't quite right but I thought it might do as a toy's jacket. I covered an old button with the blue wool. Then I did the white one, which fits on my big teddy. I think it looks rather pretty with the pink buttons which I haven't decided to attach yet or not. I've been feeling a bit blue the last couple of days to be honest, but I don't feel like I'm allowed to express my opinion, even on my very own blog that no one actually reads! Go figure.
 |
| white hexagon jacket |
 |
| hexagon jacket for a toy |
Labels:
babies,
blue,
buttons,
clothes for toys,
Crochet,
homemade clothes,
homemade gifts,
orange,
pink,
teddy bears,
toys,
white
Wednesday, February 10, 2010
Lovey Dovey Buttons
 I've been wondering if I could use recycled plastic milk bottles to make buttons, and thought to try it today with some of the left over love heart print.
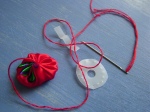 This post about how to make a fabric button made me wonder if I could make the pieces from recycled plastic, instead of buying the kits from the craft store. Buying new something so simple just to make a button seems wasteful to me. I had three goes at making the pieces from the plastic, going smaller and refining it as I went. My result is, I don't think this makes a very strong button! You could use it as a decorative button only, not a functioning one on clothing. I also cut and covered a small piece of plastic to form the missing piece for an old fabric button, which worked ok.
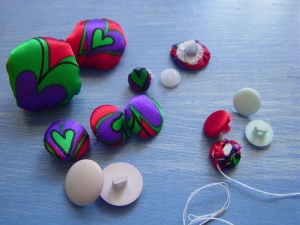 So then I went back to the net. This post about how to make a fabric button without a kit prompted me to go through my large button collection for any faded buttons that were candidates for a fabric covering. The large once-were-purple buttons worked the best, the smaller faded blue ones were more fiddly. By trial and error I found the smaller ones really need a round of cloth that was neither too small or too large. I also watched this video on making fabric buttons with a kit, it looks very simple and I wonder if I could make my own. I really like the picture frame on the wall behind her, it's holding 4 rows of cotton threads, looks cool! (wonder if I could make one from recycled materials ... )
 So that was a productive day today - I learnt how to cover buttons with fabric! I'm sure to need that skill at some point ....
edit: I'm thinking of trying to make fabric covered thumbtacs when I've collected enough tiny plastic bottle tops (eg. toothpast etc).
Labels:
buttons,
green,
love hearts,
purple,
recycling,
red,
Sewing,
Thrifty and Frugal
Tuesday, February 9, 2010
Lovey Dovey Boxer Shorts
 I found making this pair of boxer shorts challenging, but I carefully worked through the steps I knew I needed to pull this off. I took no shortcuts like I normally do with my sewing, so I'm proud of the results.
 David likes the love heart motif, but would like to have some choice when buying clothes. Love heart options for women's clothing are abundant, but for men it's pretty much limited to g-strings with hearts on it. And that's just not our style! I saw this love heart printed material and decided to grab a metre with the thought to try and make him some boxer shorts. I would copy a comfortable pair he already has, but making pants in the past has usually resulted in failure. So before doing this, I made a couple of pairs of pants for toys, going so far as to use a paper pattern for the fashion doll pants. Big teddy needed some jeans, so I threw them together from the bottom part of already cut up jeans, to check if I understood the pant pattern shape. Teddy's pants wouldn't be complete without a big cheery red button!
 Today I was ready to try and make David a new pair of boxer shorts. I started by making a paper pattern by copying David's black boxers, leaving space for seams, and cut out the shape. Pinning the material, I cut it carefully in half so I had two pieces of material. I folded a piece in half and pinned the paper pattern to the fold, then cut it out, removed it and did that to the other piece. Then I pinned the whole thing together first, before starting the sewing, something which I normally do not bother to do. First I sewed the tummy seam, then the back seam, then the crutch. The boxers looked huge! But when I checked the size by placing the black shorts on top, I saw they weren't too much larger. I made a pocket for the elastic along the waist, and threaded it through. All that was left to do was hem the bottom of the legs and wait for David to come home so I could check the elastic and sew it up.
 Bouyed by my success, I decided to make the scraps into an itsy-bitsy pair of boxer shorts for me! To my surprise they actually worked and are wearable, David even says they are cute! Needless to say, I won't be modelling them and posting a foto!!
Monday, January 25, 2010
Teddy Bear Mary Janes
 These orange mary jane slippers are meant to look silly on my purple angel beanie bear! I'm pleasantly surprised these worked out as well as they did. I did not follow a pattern at all, I made these slippers up freestyle. I did this activity to see if I was able to make up something to shape without a pattern. Maybe if I can do this, one day I'll be able to make my own freestyle socks.
 First, I started by making a flat round that was as big as the sole on the teddy's foot. For this teddy, it took 4 rounds, with the 1st round being 8 sc. These are slightly large and because crochet has some stretch, when I make these again I'll make them the same size as (not larger than) the foot.
When the sole is done, finish off with a slip stitch then start the next round moving vertical up from the sole and no longer increasing stitches. For these, it took 2 rounds before it was time to do the toe. For the toe I turn, slip stitch and sc across the front, then turn and go back, adding a slip stich in the side as required. It's a freestyle so I just worked in a stitch as was required to form the platform on top of the toes.
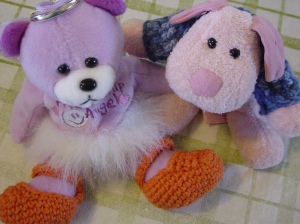 For this teddy, they took about 4 or 5 rows of sc. I then did another round along the rest of the shoe and did a couple of extra rows of about 3 sc each at the heel. Then it was time for the ankle strap which was simply a matter of chaining the required length then turning back with sc along the chain. Then I did the other side of the ankle strap, ending with about 5 chains in a little circle for the button hole. I put the shoes on the teddy to measure where the button should go and then used my tiniest hook to pull some yarn through the button to fasten it.
See? Angel just needed some high fashion shoes before hitting the town with her friend!
Saturday, January 23, 2010
Recycled Jeans Bag
 This is my first attempt at recycling an old pair of jeans into a bag. I remember a couple of friends from school used to make bags or skirts by cutting off the legs of old jeans. But when I was a teenager I never had the luxury of having an old pair of jeans to cut up, so have been wanting to try this now I can!
 For skirts they would sew a large square of material to the bottom after the legs were removed, and kept using the top of the jeans, leaving the buttons as they are. I can't remember if they would line their bags, but I gave it a go here. I haven't lined anything before and I could have done it better, that's for sure! I didn't match the width of the lining with the width of the jean waist so had to gather some lining to make it fit. The hardest part was sewing the lining to the jeans and then threading the cord through the lip I made in the lining. If I was going to do this again, I'd make the lining fit before sewing it, and I'd make the lip for the cord wider.
Perhaps this bag would be better if I made a handle out of the legs and sewed it up the sides ...
Thursday, January 14, 2010
Things You Should Never Buy
There are some things you should just never buy. If you're organised, you can source certain items by collecting them as they come to you, usually in the form of packaging when you buy other things. Knowing what to discard is important too, otherwise you'll end up with a big pile of unsorted rubbish that is practically unusable. Stash away these small things, always the same items together so you can find them when you need them. There is no point at all collecting these things if you can't put your finger on it when you need it, so do a stocktake of what you have and where it is in your house. One secret I've discovered to being thrifty is, know what you have in your cupboards, so you know what not to buy.
 Elastic Bands. You get these free all the time, from rolls of newspapers to bunches of broccolini. I keep my stash in a handy-for-nothing-else sugar bowl. Throw away old rubber bands as they age. Test them by stretching them out, if they break or don't stretch, they are too old!
Small Safety Pins. These usually come on clothing when you buy it. I stash mine away in my paper clip holder, or my sewing box.
Small Pieces of Ribbon and Elastic. Clothing and gift stores give you these all the time and they're handy for craft projects. I also cut off the ribbon from inside t-shirts and dresses that stores have so the garment will hang on the hanger. When you wear them, these ribbons are annoying and often peek out from under your clothes, so I snip them off and use them for things around my home, like a way to tie up my green shopping bags, etc.
 Buttons. Once you've got your initial collection you need never buy buttons again. When you buy clothes there's often a spare button, along with ribbon, safety pin and a small zip lock bag. Before throwing away old, ripped clothes, or if using them for rags, make sure you remove the buttons. The key to having a good collection of buttons is to have them sorted so you can find one of a certain colour and size when you need it. I collect the small zip lock bags buttons come in and use them to sort my button collection.
Bag Ties. I keep the plain white ones from bread bags to reuse on freezer bags, and throw out the rest. I keep a bunch of ties that came when I've bought some plastic bags. Sometimes I'll keep really long, tough ones that tied some electrical item to it's packaging, as they are handy.
 Pretty Tins and Boxes, eg. biscuit tins. These are often given as a practical gift and I always save biscuit tins, after we've eaten up the bikkies! They are very handy all over the house to put things in. You also often get pretty boxes as packaging when you buy things. Especially useful are plain boxes with no labeling, or easily removable labels.
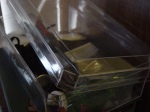 The see through ones you get with the pack of 30 Ferrero Rocher chocolates (my favourites) is particularly handy, as it's see through and stacks. Here's a picture of one that David uses as a bits and pieces box.
Strong Cardboard Boxes. If you're a renter like us, strong boxes in good condition are useful. If you don't have a good collection of boxes, you'll surely miss that when its time to move again. Some boxes I use to put things in, some boxes I store flat to be used at moving time. I often stash the boxes things came in, it'll be easy to pack them up when we move and I'll know what's inside because there's a picture of it on the box. These are pulled apart and stored flat wherever possible.
Packaging. Again, this is very useful at moving time. I also keep small pieces of foam that have come to me in the form of packaging and use them for projects like coat hanger covers. I keep all bubble wrap, and some paper wrapping you get from places like the kitchen store, etc. These are organised in a box in the storage room so when I have to start packing to move, I'll be ready. I also recycle the pages from telephone books as packaging for glassware at moving time.
 Strong Plastic and Paper Shopping Bags. Bags with no advertisement on them are good, but even if they have one, if they are strong with good handles they can be recycled. I use some strong paper ones to hold different wool projects in. That orange one from T2 Tea is great, nice colour and it's got a strong rope handle. I've collected too many plastic ones though, so I'm thinking I might turn the pretty coloured ones into plastic wool. I'll let you know how that turns out with a future blog!
 Cosmetic and Toiletry Bags. I pick these up as special deals when I'm buying something else. I've also got some handy shopping-bag sized handbags when I've bought magazines. Here's a picture of cosmetic bags I didn't buy empty, and they're good quality. I get heaps of use out of them.
Shopping Lists and Small Note Pads. Any piece of paper that would otherwise be thrown out, if it has a blank side, I fold and cut into quarters, and staple to make a small note pad. I always seem to have plenty.
Pieces of Cardboard. If you ever need a piece of cardboard for craft projects, keep a small stash of the best pieces. You often get these in the form of packaging. eg, I bought some books from BigW online, one book came with two A4 pieces of strong cardboard. I'll never need to buy cardboard for craft projects, and any fix it job around the home that needs it.
That gives me an idea for a future blog article - Times when you'll need a Piece of Cardboard! lol
 Elastic Bands. You get these free all the time, from rolls of newspapers to bunches of broccolini. I keep my stash in a handy-for-nothing-else sugar bowl. Throw away old rubber bands as they age. Test them by stretching them out, if they break or don't stretch, they are too old!
Small Safety Pins. These usually come on clothing when you buy it. I stash mine away in my paper clip holder, or my sewing box.
Small Pieces of Ribbon and Elastic. Clothing and gift stores give you these all the time and they're handy for craft projects. I also cut off the ribbon from inside t-shirts and dresses that stores have so the garment will hang on the hanger. When you wear them, these ribbons are annoying and often peek out from under your clothes, so I snip them off and use them for things around my home, like a way to tie up my green shopping bags, etc.
 Buttons. Once you've got your initial collection you need never buy buttons again. When you buy clothes there's often a spare button, along with ribbon, safety pin and a small zip lock bag. Before throwing away old, ripped clothes, or if using them for rags, make sure you remove the buttons. The key to having a good collection of buttons is to have them sorted so you can find one of a certain colour and size when you need it. I collect the small zip lock bags buttons come in and use them to sort my button collection.
Bag Ties. I keep the plain white ones from bread bags to reuse on freezer bags, and throw out the rest. I keep a bunch of ties that came when I've bought some plastic bags. Sometimes I'll keep really long, tough ones that tied some electrical item to it's packaging, as they are handy.
 Pretty Tins and Boxes, eg. biscuit tins. These are often given as a practical gift and I always save biscuit tins, after we've eaten up the bikkies! They are very handy all over the house to put things in. You also often get pretty boxes as packaging when you buy things. Especially useful are plain boxes with no labeling, or easily removable labels.
 The see through ones you get with the pack of 30 Ferrero Rocher chocolates (my favourites) is particularly handy, as it's see through and stacks. Here's a picture of one that David uses as a bits and pieces box.
Strong Cardboard Boxes. If you're a renter like us, strong boxes in good condition are useful. If you don't have a good collection of boxes, you'll surely miss that when its time to move again. Some boxes I use to put things in, some boxes I store flat to be used at moving time. I often stash the boxes things came in, it'll be easy to pack them up when we move and I'll know what's inside because there's a picture of it on the box. These are pulled apart and stored flat wherever possible.
Packaging. Again, this is very useful at moving time. I also keep small pieces of foam that have come to me in the form of packaging and use them for projects like coat hanger covers. I keep all bubble wrap, and some paper wrapping you get from places like the kitchen store, etc. These are organised in a box in the storage room so when I have to start packing to move, I'll be ready. I also recycle the pages from telephone books as packaging for glassware at moving time.
 Strong Plastic and Paper Shopping Bags. Bags with no advertisement on them are good, but even if they have one, if they are strong with good handles they can be recycled. I use some strong paper ones to hold different wool projects in. That orange one from T2 Tea is great, nice colour and it's got a strong rope handle. I've collected too many plastic ones though, so I'm thinking I might turn the pretty coloured ones into plastic wool. I'll let you know how that turns out with a future blog!
 Cosmetic and Toiletry Bags. I pick these up as special deals when I'm buying something else. I've also got some handy shopping-bag sized handbags when I've bought magazines. Here's a picture of cosmetic bags I didn't buy empty, and they're good quality. I get heaps of use out of them.
Shopping Lists and Small Note Pads. Any piece of paper that would otherwise be thrown out, if it has a blank side, I fold and cut into quarters, and staple to make a small note pad. I always seem to have plenty.
Pieces of Cardboard. If you ever need a piece of cardboard for craft projects, keep a small stash of the best pieces. You often get these in the form of packaging. eg, I bought some books from BigW online, one book came with two A4 pieces of strong cardboard. I'll never need to buy cardboard for craft projects, and any fix it job around the home that needs it.
That gives me an idea for a future blog article - Times when you'll need a Piece of Cardboard! lol
Labels:
blue,
buttons,
Crochet,
free and fun,
love hearts,
orange,
pink,
plastic bags,
purple,
recycling,
Sewing,
Thrifty and Frugal,
white
Subscribe to:
Posts (Atom)

