This is a very special memento from my old life as a professional vocalist in Darwin.
In 2001 and 2002 I was studying voice as part of a Bachelor of Music at the now Charles Darwin University (it was called the Northern Territory University back then). I was attempting to finish this extra degree for which I would get a lot of exemptions, the main challenge was completing the musical performance units which would take 3 years part-time. The main reason I was doing this was because I had a highly desirable job at the Northern Territory Music School as a vocal and choir teacher, something that was coveted by other teachers and I was exceptionally lucky to have. So the pressure was on me to prove myself and that I deserved my place there.
It was during this time that I did some unpaid performance work, where prior to that I had always been paid. My voice lecturer was a wonderful lady called Kathy Banks, she was absolutely amazing and lovely. So of course, when she asked me if I was available for a Gilbert and Sullivan production she was directing I accepted! It was a showcase of excerpts from Gilbert and Sullivan musicals, I would play the part of Peep-bo, one of the three little maids in the Mikado excerpt. It was so much fun. I was glad I made it clear I didn't want the lead so I was able to enjoy it and lend comfort to the other performers, as many of them had not performed before a large audience before. This was held in the Darwin Entertainment Centre, and I'm not sure how big the audience was maybe several hundred or more. This paper lady in a red dress was given to me as a thank you gift, and it is such a special memento for me to cherish now I no longer do that kind of work.
Of course, I don't perform any more so this is a mere memory from my past. It's so very special for me that I still have this, after so much else I have lost. It is a memory of a fun event during a very hard time for me. I was in the process of leaving my husband, and by mid-2003 a colleague had committed suicide so my world pretty much fell apart from that point and I didn't finish the third year performance units. I didn't show up for my mid third year exam as it was a week after that terrible event, then I pulled out of the rest of third year altogether and left Darwin for good 12 months later. At least I had successfully finished my end of second year exam with a very difficult 50 minute performance. It was opera and included pieces in Italian and German as well as English, it was the hardest performance I've ever done. I have never rehearsed so much for anything in my life, rehearsing once or twice every single day for over 2 months so ended up doing very well. I was determined not to make a fool of myself and just had to grit my teeth and do it, it was very hard. I did all this while I was secretly planning to leave my husband without him knowing as I was scared for my safety, rehearsing at home everyday while still living with him. No one I know now came to see my exam, my family was busy, and there is no video of it which is a real shame but at least I can remember it.
Looking back I can't believe how I possibly got through that time in my life as well as I did, despite it being one big mess. But special memories like Kathy Banks and these performances remind me I am probably stronger than I think I am! Thanks to Kathy and the kind people that I knew back then I someone how got through a terrible period of my life. <3 <3 <3

Monday, June 28, 2010
Saturday, June 26, 2010
Seeing Pink
Throughout my life, I've owned several pairs of rose-coloured glasses. What started off as a performance costume item become something of a 'statement'! This is my post for this week's Pink Saturday which is hosted by Beverly @ How Sweet the Sound.
The first pair of pink sunglasses I bought cost me $10 I think, and it was an impulse buy. It was during a period of time that I was collecting brightly coloured items to add to the performance costumes for my children's entertainment group called the 'Tootee Fwoots'. My business was often employed to provide family entertainment, mostly by the city councils in Darwin and Palmerston for 'Fun in the Park' days and events, and sometimes by the shopping centres and sports clubs for their family days.
One day, my normal pair of sunnies broke, and I couldn't bare to go out into the daylight without a pair, especially in Darwin after I'd had a late night! I did have this pair of rose-coloured glasses, so chucked them on. I loved how they made the bright cloudless blue sky a pretty shade of lavender, and decided I should make a statement! During the day I was working as an early childhood teacher, so I needed to stay positive and chipper and these glasses were just the ticket!
Eventually, my first pair of pink glasses broke, but I kept one of the pink lenses as a memento. It now lives in my small blue trinket box where tiny special memories are collected. After I bought the first pair and fell in love with them, I tended to buy any cheap pink glasses I came across. I think the pink ones here with the thick plastic frames might have only cost me $5! I still have these two pairs left, but I don't wear them any more. But I think it's important to remember that period of my life, when I was free and brash. Some people thought I was a bit strange for wearing pink sunglasses, but plenty more people understood what I was saying, that it was a tongue-poke at a silly world that took itself too seriously.
Now, I think back to the time when I used to wear pink sunnies. It was a good time, but there does come a point when we must take off our rose-coloured glasses to look at the world and accept it for what it is. I am learning to sit with it, look at it, not to buy into it, not to argue with it, for the world is as it is. But sometimes, seeing the Pink is not a bad thing either, and good to keep in mind, to come back to and remember.
Be sure to check out pretty pinks @ Pink Saturday.
<3 <3 <3
Friday, June 25, 2010
Planning Barbie's Big Day
Well, Barbie is not quite ready for her big day as she hasn't even met Ken yet, and he certainly hasn't figured out what he is wearing! But at least the girls are sorted, the bridesmaids are already chosen!
Oh yes, Barbie has her priorities straight, doesn't she? She knows what she will wear and she will look Fabulous!!!
rofl!
This is my contribution to the Wedding blog party hosted by Angelic Accents, I hope it gives a little giggle. I hand crochet all the doll dresses myself and each have a blog post. The White wedding dress, Strapless pullon dress, Teal Dress and the Pink Dress were all inspired by a doll dress I still have from my childhood that was made by my grandmother.
This post is tongue in cheek because my partner and I agree we want to be married officially before our baby arrives, but all we have done so far is get our rings, we can't seem to bring ourselves to organise anything else!
I hope you liked my little wedding blog party post!
<3 <3
Wednesday, June 23, 2010
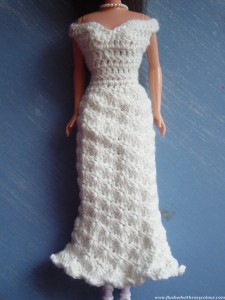
A White Dress for Barbie
I'm very surprised how this turned out, how could it be that the bodice of this dress fits so perfectly? This is my post for White Wednesday which is hosted by Faded Charm. I'm also putting this in for this week's Transformation Thursday hosted @ The Shabby Chic Cottage.
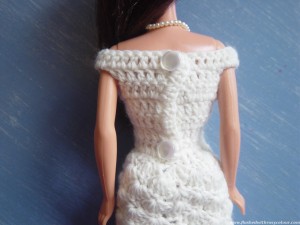
I used white dimples baby yarn from Lincraft, that's their cheapest baby yarn and it costs $1.99 for 50g. I started with the bodice as usual with all of these dresses I make, working up from the waist. When I got to the cleavage area I attempted a sweet heart neckline. I have attempted this before on a top I've made but undid it as it didn't work out. This time I did it over two rows and I am totally amazed at how perfectly it sits, I was certain it would be a little wonky.
The skirt is the 5 cluster separated by english doubles in the cluster below pattern which I saw in a picture of a Barbie doll wedding dress, although that's the only thing I used from that pattern. I didn't plan for the skirt to be this shape at all, it just kind of happened. I forgot to increase more before starting the shell pattern so the skirt is more fitted at the top, so then I flared out at the bottom. It was nice but it needed something more so I finished off with a row of picots, and low and behold, they really wanted to sit up in the air like that! It kind of looks funny but it is a 'white dress' after all, so they are kinda of required by law to look a bit frilly and silly!!! lolzzz
I have many white buttons and I knew I wanted the one holed pearl kind, but the only ones I could find in my stash were a little too big or had peeling polish so I actually bought these buttons new /gasp! That really is naughty for a doll's dress isn't it? I got some really cheap ones and there are plenty left over to use on other things, so I figure I'm not toooo bad!
The last thing to do was to make something white for her hair so I just whipped this thing up. It's simply a row of English trebles (US dc) to allow room for ribbon to be threaded through, then some shells like the skirt on top of that. I didn't really know what I was making, this kind of just happened! I threaded the ribbon through then around again to form a loop that the hair could go through. Tying it tightly keeps her flyaway hair in place and every bride needs a little something white on the head, don't you think?
<3 <3
Be sure to check out other pretty whites @ White Wednesday!
My favourite highlight from this week's White Wednesday
Check out lots of cool & crafty ideas @ Transformation Thursday!
I checked every participant this week for this blog party as I always find so many useful posts. Here are some of my favourites.
I also found these Ten Parenting Tips @ Real Parenting Tips
I used white dimples baby yarn from Lincraft, that's their cheapest baby yarn and it costs $1.99 for 50g. I started with the bodice as usual with all of these dresses I make, working up from the waist. When I got to the cleavage area I attempted a sweet heart neckline. I have attempted this before on a top I've made but undid it as it didn't work out. This time I did it over two rows and I am totally amazed at how perfectly it sits, I was certain it would be a little wonky.
The skirt is the 5 cluster separated by english doubles in the cluster below pattern which I saw in a picture of a Barbie doll wedding dress, although that's the only thing I used from that pattern. I didn't plan for the skirt to be this shape at all, it just kind of happened. I forgot to increase more before starting the shell pattern so the skirt is more fitted at the top, so then I flared out at the bottom. It was nice but it needed something more so I finished off with a row of picots, and low and behold, they really wanted to sit up in the air like that! It kind of looks funny but it is a 'white dress' after all, so they are kinda of required by law to look a bit frilly and silly!!! lolzzz
I have many white buttons and I knew I wanted the one holed pearl kind, but the only ones I could find in my stash were a little too big or had peeling polish so I actually bought these buttons new /gasp! That really is naughty for a doll's dress isn't it? I got some really cheap ones and there are plenty left over to use on other things, so I figure I'm not toooo bad!
The last thing to do was to make something white for her hair so I just whipped this thing up. It's simply a row of English trebles (US dc) to allow room for ribbon to be threaded through, then some shells like the skirt on top of that. I didn't really know what I was making, this kind of just happened! I threaded the ribbon through then around again to form a loop that the hair could go through. Tying it tightly keeps her flyaway hair in place and every bride needs a little something white on the head, don't you think?
<3 <3
Be sure to check out other pretty whites @ White Wednesday!
My favourite highlight from this week's White Wednesday
- another beautifully embroidered baby dress @ The Old Fashioned Sewing Room
Check out lots of cool & crafty ideas @ Transformation Thursday!
I checked every participant this week for this blog party as I always find so many useful posts. Here are some of my favourites.
- make home-made wood polish @ Nancy's Tidbits
- chalkboard top desk @ Twice Lovely, chalkboard labels @ The Scrap Shoppe, reuse the back of a photo frame chalkboard @ Keeping it Simple, old chalkboard makeover @ My Magic Mom
- ideas for home-made kids clothes @ Little Lizard King
- no glue stretchy button headband @ Love Stitched, cute girls dresses @ The Train to Crazy
- how to cut up a watermelon @ The Pumpkin Patch, jello rockmelon @ How Does She?
- home-made beauty products like parsley toner @ Homemade Mamas
I also found these Ten Parenting Tips @ Real Parenting Tips
- Read to your children.
- Have the courage to say “NO!” at times.
- Create meaningful family traditions.
- Make home a place where your children want to be.
- Have Family Dinner every night.
- Teach your children to work – and work with them.
- Support your child’s interests.
- Talk with, not at your children.
- Listen.
- Say “I love you” often.
Monday, June 21, 2010
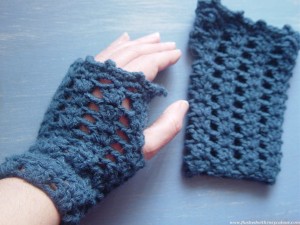
Blue Fingerless Gloves
I really enjoyed working with this lovely lima alpaca blend yarn from Lincraft, it's so soft! This is my post for this week's Blue Monday hosted by Smiling Sally.
Because the Lincraft pattern specified this particular yarn I splurged out and got it, although now I know the pattern I'm sure I could substitute other wool from my stash. The pattern was very easy and is another one in the Crochet 08/09 booklet I bought a couple of months ago.
I'm very pleased with how these worked out, they're perfect for wearing while typing on the computer during the winter months. Have you ever tried typing while wearing normal fingered gloves? LoL, it's just not possible no matter how unfrozen your fingers are!
Be sure to check out other lovely blues @ this week's Blue Monday!
<3
I had a quick look at all the participants this week, something I haven't been able to do before. It does take a long time so I didn't comment on most. A couple I did comment on, and this was my favourite to link, for my future reference.
- some lovely embroidery and crochet examples @ Cabin & Cottage
Saturday, June 19, 2010
Two Berry Pink Hats
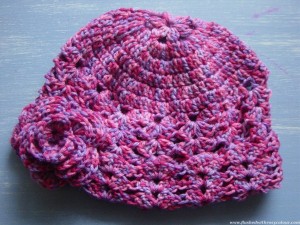
I bought 5 balls of this 'Berry Mix' Lincraft DK wool last year for my birthday, thinking I might make a simple rug with it, but of course that hasn't happened! This is my post for this week's Pink Saturday blog party hosted by Beverly @ How Sweet the Sound.
I made this flower hat one evening while watching some television, the final episodes of Bones and Castle to be exact! I call this hat a 'flower' hat because I started it off with a small 6 petal flower. Each petal is a cluster of 3 trebles all pulled together in one stitch, each petal is then separated by 3 chains. Then I work out in flat rounds, increasing slightly each round until it was just slightly smaller than my out-stretched hand. Then I used the shell pattern down the sides as I did with my wine coloured beanie. This pattern usually makes hats smaller so I was careful to make sure this hat would fit an adult.
This is now the 3rd rose I've made like this to make into a detachable brooch to go with the hat. I still had to refer to Rachel's pattern at Crochet Spot as I haven't yet memorised it. I highly recommend Rachel's website if you are in need of some crochet patterns, its very nicely set out. Just remember her patterns are in American crochet, not English. The cost of the wool I used for this hat and matching brooch was less than $2, and I used a 4mm hook.
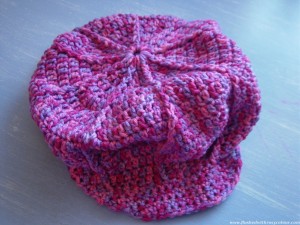
Using the same wool I also made a hip-hop cap following the pattern in the Crochet 08/09 booklet from Lincraft. I didn't check the gauge so that might be why this hat turned out a bit on the big side, although I'm not sure if it's meant to be like that! It didn't take me long and I whipped it up in about 3 or 4 hours while we watching tv and David was cooking.
I hope you like seeing two more of my hats, this time they are Berry Pink! And be sure to check out other pinks at this week's Pink Saturday blog party @ How Sweet the Sound!
<3
Some selected highlights from this week's party
- inspirational home-made mosaics @ Anne Fannies Green Acres
- new party goer's pretty quilted handbags @ Kitty and Me Designs
- create from the heart @ Heart of a Wizardess
- Heaps of Inspirational Craft Areas, just a small selection of the wonderful spaces at this week's party
eg.
Someplace in Thyme
She's Sew Pretty
Creative Chaos
Studio 48 Tango
Friday, June 18, 2010
The Table my great-grandfather made
There is a real story behind this special little table and how it came to be in my possession.
This small bedside or occasional table was made by my great-grandfather Charlie, the father of my father's mother Mavis. Apparently he was a skilled carpenter, and my understanding is that he hand-crafted the swirl you can see in the middle. This is the only thing I know of that was made by my great-grandfather that is still in our family and I am very privileged to be the custodian of this historical family piece.
This table has obviously had an eventful life, it even has a coffee stain on the top. But I'm not going to touch this, or attempt to restore it. Its just not going to happen. Anything I could do, or anyone else for that matter in my opinion will only take away from it's character. No way could a 'fresh coat of paint' make this look better because it will make something old look new and you will not see it for what it is. New is not always better. It is a very special turn of events that allows this table to be in my possession. You might think this table, being made by father's grandfather, might have been handed to me by my father but it was not.
When my great-grandfather's first wife died, he remarried a lady who the family came to call "Aunty Annie". Mavis and Aunty Annie didn't get along, so Mavis didn't inherit her father's things. Aunty Annie's best friend was a lady named Margaret, who adopted her niece Beverly. When Aunty Annie died, Beverly inherited her things, including my great-grandfather's table. But Beverly and Mavis knew each other, and they had introduced their children to each other. Dennis was Mavis's son and Heather was Beverly's daughter, and they are my parents. When my grandma Beverly died a couple of years ago, her daughters agreed I should get the table.
I love the history behind this table, it makes it all the more special. I think its sad we don't have more things like this in our family, things that are meaningful and made by our ancestors. Old things should be cherished and passed to those who appreciate their meaning. That's just my opinion!
I hope you enjoyed hearing the story behind this special piece of furniture my great-grandfather made.
<3 <3 <3
Thursday, June 17, 2010
A Barbie Doll with Green Earrings
I just love how this $1 salvaged doll turned out, I think she was a really great find! This doll's amazing transformation is my post for Transformation Thursday which is hosted by The Shabby Chic Cottage.
I found her naked at the Greenslopes Lifeline store tied up with another Barbie and a shoeless Bratz doll for 2 dollars. I'm not sure yet what I'll do with the Bratz doll, and the other Barbie has hair in very poor condition. I'm actually wondering if I'll give up on the other dolls and maybe sell them on ebay.
This doll with green earrings was in such good condition I knew I could clean her up well so this is the second doll I 'restored'. I combed, conditioned, shampooed the hair with herbal shampoo. Then I left conditioner in the hair for 3 minutes after combing through, rinsing thoroughly when done. I washed the doll's body with shampoo also, there was a black mark that could be texta on her leg that didn't come off straight away but now it has rubbed off. I finished off the hair my smoothing some baby oil over it lightly when it had dried naturally.
I chose the lovely multi-coloured baby wool for her dress with flecks of green in it, and I'm really happy with how it turned out. I added the raised ribs into it as I went along, and made it a pull-on style so it's easier for a younger child to dress the doll. The stitch on the skirt is something I saw at craft group and involves clusters of 5 trebles (English) that are separated with an English double in the middle of the cluster below. I saw this in a picture for a wedding dress for a Barbie doll.
All is left to do is make some cute scuffs for her flat feet, which have very cute pink painted toenails! I finished these orange sandals yesterday, they are a cinch to make! And because it's winter here now she looked a trifle cold in her strapless dress so I put on the green shrug I did months ago when I was trying to work out how to make one for me. The green shrug was just a random thing I did while I was trying to understand how shrugs were shaped.
I'm really happy at the transformation of this bargain $1 doll, from naked in the op shop bin to cleaned and dressed, she has scrubbed up very nicely indeed!
I just love looking through the other posts for Transformation Thursdays, there are always fantastic ideas, I highlight my favourites below. If you love home crafty things, be sure to check out the other blog party posts at The Shabby Chic Cottage.
<3
Some of my selected highlights from this week's party (oh so many!)
- chalkboard paint ideas @ A Little Bit of Sanity and a Lot of Chaos AND @ House of Grace
- craft room storage ideas @ Clean Mama AND @ In My Own Style
- easy apron pattern with adjustable neck strap @ Yards and Yards
- how to look after a wood chopping board @ Tools Are for Women Too
- hanging jewellery organisers @ Red Heads Craft More Fun
- make a reusable workbook using an old album @ Feels Like Home
- what to do with a bored child @ Somewhat Simple
- a really pretty rag doll with fleece hair @ Sew Much Ado
Wednesday, June 16, 2010
White Rose of Peace
I've made a flower to go with the white hat I made about four years ago without a pattern. I like to call the flower I made for it "The White Rose of Peace" ! This is my post for this week's White Wednesday blog party hosted by Faded Charm.
I've made this flower before using the rose pattern on Rachel's Crochet Spot website. I prefer to attach these flowers to a safety pin so they are removable according to whim and fancy! This one was made with white wool I was given amongst a large unwanted stash by the mother of a friend, and I used a 3.5mm or 4mm hook for the flower.
I've decided my White Rose of Peace shall bring Harmony and Tranquillity to all who look at it with Magical Imagination! It is a special flower I've made for good luck and forgiveness!
<3 <3 <3
Be sure to check out other wonderful whites @ White Wednesday!
My selected highlights from this week's party
I've made this flower before using the rose pattern on Rachel's Crochet Spot website. I prefer to attach these flowers to a safety pin so they are removable according to whim and fancy! This one was made with white wool I was given amongst a large unwanted stash by the mother of a friend, and I used a 3.5mm or 4mm hook for the flower.
I've decided my White Rose of Peace shall bring Harmony and Tranquillity to all who look at it with Magical Imagination! It is a special flower I've made for good luck and forgiveness!
<3 <3 <3
Be sure to check out other wonderful whites @ White Wednesday!
My selected highlights from this week's party
- beautifully hand embroidered baby dress @ The Old Fashioned Baby Sewing Room
- chalkboard tray @ Keepin' Up with the Tatums
- beautiful photographs of white flowers @ Laughing with Angels
- a wonderful collection of white pottery @ Cabin & Cottage
Tuesday, June 15, 2010
Purple Bolero Shrug
It took me a week or two, doing a bit now and then while we were watching tv in the evenings, to finish this bolero shrug. This is the first crochet thing I've made to wear, other than beanies and scarves!
bolero shrug, pattern by Lincraft |
Now I know the pattern I think I could make this again with other wool... hopefully! Making this bolero shrug taught me how to do raised ridges which you can see at the cuffs. I've been enjoying adding this new stitch to a couple of other projects I've done since, like a beanie and a doll's dress, which I will post about soon.
Nice Navy Blue Beanie
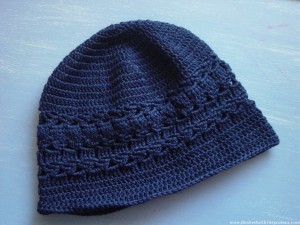
This could very well be the nicest beanie I've made so far. Although I don't know why I used a 3mm hook with fine wool like this, it took me ages! I'm glad my brother liked this beanie enough to wear so I gave it to him! This is my post for Blue Monday hosted by Smiling Sally.
This was going to just be a simple beanie like others I've made, but because the hook was small and the wool was fine, it was taking a lot longer to finish. It's nice and neat but I was getting bored, so I just had to add in some pattern, didn't I? The pattern isn't too feminine I think and would be fine for a man to wear, this is an adult sized beanie.
I made up the patterned part because I was bored. It's a three row pattern repeated three times, I'll try and write it out. It's a bit hard to explain, but it looked good in the end. I used cheap craft wool from Lincraft for this, it was on special for $2. I don't mind using cheap wool while I'm still learning, one day I will use nicer yarn.
Repeated 3 round pattern
1. ch3, db tr (American treble) in next treble (American double), skip 2 trebles, db (American single), repeat to end
2. turn and go the opposite way to all other rounds, ch 3, db tr into st ch sp (American treble), db into 2nd ch sp (American single)
3. turn back to the same way for all rounds except round 2, 4 db tr into each chain space (American treble)
Be sure to check out other participants for more blues @ Blue Monday!
My selected highlights from this week's party -
- a wonderful nursery mural @ The Paint Splash
- romantic poetry @ Rinkly Rimes
- beautiful blue and white pottery from Italy @ No Minimalist Here
- lovely blue delphiniums @ Reach Beyond Limits
- someone else has a ginger jar just like mine @ A Delightsome Life
Sunday, June 13, 2010
Restoring Two Old Barbie Dolls
I found these two gems at a secret location! If I told you where, I would then have to kill you!!! /jokes!
I've found a little second hand store that is convenient for me to drop in regularly, so I can check if they have any more from time to time. I found these two naked and bagged up together for just $2. That's a dollar each! I think they are simply gorgeous! As a way to help mend the sadness of loosing my special childhood Barbies, I would like to see if I can restore them! This picture was taken on their first day, when I simply could not bring myself to photograph them naked, so I chucked on the blue dress and whipped up the grey one very quickly.
The blue dress is the first one I made, using the dress my Nanna Pam made for inspiration. This dress is now with my niece. I gave it to her to go with the new base model Barbie, as a farewell gift on her way back to live in Darwin. For the other doll, I just grabbed some grey wool that I had handy and quickly made up the winter dress, this time it was shapeless so I made a belt for it later. My niece didn't like the grey dress which is why I still have that one. Otherwise I would have chucked it in with the other clothes I gave her!
I started with the doll on the right, and washed her hair following instructions on several sites on how to wash Barbie doll hair. A couple of sites said to put baby oil on it at the end to smooth it down, so I did that although I was worried it would ruin it. I started by gently combing out the tangles. It was pretty bad and some of the hair did come out. Then I wet, conditioned and rinsed first, then washed and rinsed, then conditioned it again, leaving in the conditioner for a couple of minutes, then rinsed thoroughly. I just used my herbal shampoo as it was all I had. I combed through again and let it dry over night, roughly holding the hair in place with a loose hair tie around her neck. When the hair was dry the next day, I put a little baby oil on my hands and just smoothed down the ends. I'm very surprised at the softness of the end result. I'm also thinking that these dolls are perhaps not as old as I first thought, because the hair has come up quite ok.
To celebrate this old doll's restored hair, I made her a new dress in some nicely coloured fine teal wool that my mum gave me. A pair of white shoes match the wide-brim white hat I made. She had to borrow the doll stand from my grandmother's porcelain doll for this photograph, as that's the only one I have. Perhaps I need to get more dolls stands? LOL! I don't think I'm going to get into the doll collecting thing serious enough for that!
Today I cleaned up the other doll of this pair. Her hair was a real mess, which is why I left her til this morning because I was a bit afraid of it! It took me a while to untangle it, some hair did come out but not as much as the other doll. She also has some damage on her right forearm, I don't know what it is and couldn't find anything about that kind of thing on the net. So after her wash I used nail clippers to remove as much of the peeling plastic as I could and made her a little bracelet to help hide it. I also put a couple of pins with matching beads into the wholes in her ears so she has matching earrings. A couple of plastic accessories like the orange shoes, topped off with a winter beanie hat results in a very cute look I think!
I'm finding restoring these very cheap dolls rewarding, because they only cost $1 and come up very nicely. It's a lot more enjoyable than buying a new doll. I now regret getting new dolls now I know you can get nice ones so cheaply! And once you take a doll out of the box it's value decreases just like driving a new car out of the car yard!
Saturday, June 12, 2010
A Tiny Pink Baby Doll Jacket (My Barbie Wanted a Baby!)
The other week when I went to K-Mart to buy a new doll for my niece I saw these tiny baby dolls and just had to have one!!!
Barbie doll with a baby |
It was when I was making the tiny teddy bears that the smallest pink one reminded me of a baby, then it occurred to me that my Barbie wanted a baby!!! I'd actually been looking for a doll like this over 6 months ago, before I bought my Barbie doll with the excuse of using it to practice making clothes!
a tiny pink jacket for a tiny baby doll |
Isn't the tiny pink jacket I made perfect for such a sweet little baby doll???
a tiny baby doll with tiny pink bottle |
For the tiny baby doll clothes I used a 3mm hook, white and purple 'dimples' yarn from Lincraft, as well as some old pink baby yarn my mum gave me. These are my own patterns that I made up to fit the doll. The doll is a 'My Mini Baby Born' which I bought from K-mart for $8.
crochet outfits for Barbie and Baby |
Friday, June 11, 2010
Winter Hat Collection 2010
Here is a gallery of all the hats and beanies I've finished so far!
I'm hoping to give some of these to family as gifts, I just don't know which ones they would like so I hope they can tell me! <3 <3 <3
I have already written on my blog about some of these hats, but I'll be posting more in future, explaining how I made them, the pattern and washing instructions for the wool.
[gallery columns="5"]
I'm hoping to give some of these to family as gifts, I just don't know which ones they would like so I hope they can tell me! <3 <3 <3
I have already written on my blog about some of these hats, but I'll be posting more in future, explaining how I made them, the pattern and washing instructions for the wool.
[gallery columns="5"]
Labels:
babies,
Barbie,
blue,
brown,
clothes for toys,
Crochet,
crochet flowers,
crochet stitches,
green,
hats,
orange,
pink,
purple,
red,
Thrifty and Frugal,
white,
yellow
Thursday, June 10, 2010
A Family of Grey and Green Beanies
This is the post I planned for today's Transformation Thursday party hosted by The Shabby Chic Cottage, but who would have known that today we also have some special news to share? We have a 3rd member of our little family on the way or so the home test I did this morning says, so this family of three beanies seems especially appropriate!!!
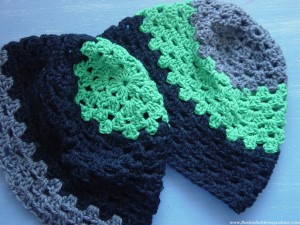
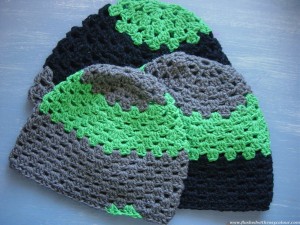
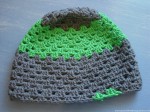
Back to the beanies ... The first beanie I did followed part of a pattern in the Lincraft booklet I bought. I just made it longer, skipping the ears and edging, so it's a bit different. That's the hat with the grey pinwheel at the top. I don't really like how the pin-wheel doesn't match the rest of the hat, so the second hat I did was different. I based it on the first hat but this is my version.
Basically, you start with a round of 6 clusters of 3 trebles (American doubles) each separated by a chain, the second round has 12 clusters, 2 in each space, each pair is also separated by a chain. Except for rows 5 and 9, you just put a cluster of 3 trebles in each space. For rows 5 and 9, put an extra cluster in every 3rd space, divided by a chain. I know that's not the right way to write a crochet pattern, but I can hardly read them myself, so that's my understanding of the pattern! It's pretty basic and very quick to do.
For the first hat, I used a 5mm hook which made it fit me. For the second hat I used a 6mm hook so the hat is bigger and fits David. To consolidate the pattern in my mind, I made a 3rd beanie just with left over green and grey as I'd run out of black. The pattern and the wool are the same, the only thing that's changed is the hook. For the smallest hat I used a 4.5mm, and it's a good thing I didn't use the 4mm like I nearly did then it would have been too small! I rather like how the odd two green clusters look at the brim, it makes it look quirky!
This was a great exercise for me to do. I've now found a great, easy and quick beanie pattern that I can memorise and I can simply change the size of the beanie by using smaller or bigger hooks! These three beanies were very quick and took less than a day to whip up!
<3 <3 <3
My selected highlights from this week's party
Back to the beanies ... The first beanie I did followed part of a pattern in the Lincraft booklet I bought. I just made it longer, skipping the ears and edging, so it's a bit different. That's the hat with the grey pinwheel at the top. I don't really like how the pin-wheel doesn't match the rest of the hat, so the second hat I did was different. I based it on the first hat but this is my version.
Basically, you start with a round of 6 clusters of 3 trebles (American doubles) each separated by a chain, the second round has 12 clusters, 2 in each space, each pair is also separated by a chain. Except for rows 5 and 9, you just put a cluster of 3 trebles in each space. For rows 5 and 9, put an extra cluster in every 3rd space, divided by a chain. I know that's not the right way to write a crochet pattern, but I can hardly read them myself, so that's my understanding of the pattern! It's pretty basic and very quick to do.
For the first hat, I used a 5mm hook which made it fit me. For the second hat I used a 6mm hook so the hat is bigger and fits David. To consolidate the pattern in my mind, I made a 3rd beanie just with left over green and grey as I'd run out of black. The pattern and the wool are the same, the only thing that's changed is the hook. For the smallest hat I used a 4.5mm, and it's a good thing I didn't use the 4mm like I nearly did then it would have been too small! I rather like how the odd two green clusters look at the brim, it makes it look quirky!
This was a great exercise for me to do. I've now found a great, easy and quick beanie pattern that I can memorise and I can simply change the size of the beanie by using smaller or bigger hooks! These three beanies were very quick and took less than a day to whip up!
<3 <3 <3
My selected highlights from this week's party
- a practical hooded beach towel converts into a backpack @ The Train to Crazy
- recycle plastic jar lids to make ladybug toys @ Crafts by Amanda
- make ruffle pants to go under girl's dresses @ Little Lizard King
- chalkboard painted herb pots @ Rose Petals and Rust
- button magnets @ Everything Else I Love
Wednesday, June 9, 2010
Barbie's White Kaftan and Sunhat
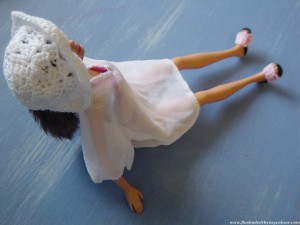
Barbie with white kaftan and sun hat |
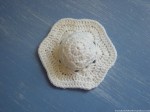
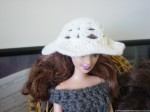
When my sister visited me last week with her beautiful 3 year old daughter, I had this doll ready to give in case my niece liked it, which she did! As new, the doll only comes with a bikini, so I had to make a kaftan as David suggested! And because she is going to Darwin to live, she needs clothes for the tropics! Everyone going to Darwin absolutely must have a hat, so I made her a cute white hat to match the kaftan! The day after my niece left with this doll and the white outfit, I made another hat with white wool, this time with a wider brim.
I also made the cute pink scuffs which were very easy to make with a tiny bit of vinyl plastic and fine crochet cotton. As well as this special outfit, I gave my niece some of my other Barbie clothes, like a blue dress and a rainbow top which I don't have a foto of. So now I have an excuse to make more Barbie clothes!
Hurrah!!
Sunhat, using 2.5mm hook and medium yarn.
Top of Hat
1. small beginning chain then 12 trebles, sl st
2. ch 2, 2 trebles in ea treble, sl st
3. ch 1, (1 x double, 2 x double) to end (optional for a bigger hat, omit for a tighter hat)
Sides of Hat
4. ch 2, 2 trebles in same sp, sk 5 trebles (skip 3 two times then 4 in smaller hat), (3 trebles 1 ch 3 trebles in 6th treble) to end, 3 trebles in same sp as 1st ch 2, ch 1, sl st
5. (repeat row 4 which has 6 pairs of shells) ch 2, 2 trebles in same sp, (3 trebles 1 ch 3 trebles in next chain 1 sp) to end, 3 trebles in same sp as 1st ch, ch 1 sl st
Brim of Hat
6. ch 2, 4 trebles in same sp (9 trebles in next ch 1 sp) to end, 4 trebles in same sp as 1st ch 2, sl st (6 x 9 trebles)
7. ch 2, 2 trebles in same sp (1 treble in ea of next 4 trebles, sk 1 treble, 1 treble in ea of next 3 trebles, 3 trebles in next treble) sl st
8. for optional wide brim hat, 1 treble in every treble, except 3 treble in the 5th treble (middle)
Kaftan
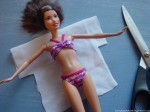
To make the kaftan I merely cut a very simple piece out of very fine material and handstitched it. I did not double over my thread like I normally do to reduce the bulk, I also only fold the edges once instead of twice for the same reason. Although its a very simple pattern, it took me all morning to hand-stitch. But it was good to work out how to do, if I do it again it will be quicker and also, better!
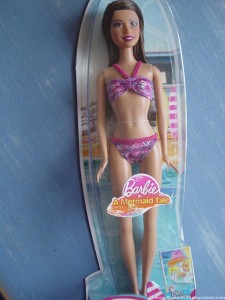
Here is an image of our farewell party for the new Barbie that went to Darwin with my niece! For future reference she is Barbie in "A Mermaid Tale", also otherwise known as a Beach Barbie. In the picture you can see a baby doll, which I will be making an outfit for in a future post!
<3
Be sure to check out other beautiful whites @ Faded Charm, which is host to the White Wednesday blog party.My selected highlights from this weeks party
- lots of cute white baby shoes @ juNxtaposition
- a beautiful smocked baby dress @ The Old Fashioned Baby Sewing Room
- gorgeous images of a white peacock and love-heart birdcage @ Life is What You Make Of It
- a pretty idea for a crochet summer top @ Olga's Home & Garden
Subscribe to:
Posts (Atom)