Monday, January 9, 2012

Handmade 1st Birthday Card for Thomas

Thomas turned one nearly a month ago, but we've been so busy catching our breath after a very busy Christmas season, this is the first chance I've had to blog about it!

This was our first 'proper' Christmas with Thomas, as his first Christmas was spent in the hospital nursery, and I was still in hospital that day myself. That's why we decided we should make an extra effort this season, and visit everyone in the family, which we managed to do, except for seeing my sister and her family in Darwin. We hadn't gone anywhere all year, with Thomas being so small I didn't feel confident enough. So Christmas was a very busy season for us indeed this year, and we've decided we should spread things out a bit better next year so it's not so overwhelming!

One thing we can't change though is Thomas' birthday, which is on December 14th, right when things start to get busy. We had to have a party of course, in fact we celebrated all week with visits from family and friends spread out so our small home would not be too crowded in case it rained. Thankfully it didn't rain! My mum came to visit Thomas on the day though, and brought gifts and this very special handmade 1st birthday card.

I just adore my mum's handmade greeting cards, don't you? They are so special. I'm trying to convince her to try and sell some, I think they might be popular!

Sunday, January 8, 2012

Monster Beanie for a Small Child

I made this monster beanie yesterday, thinking it was going to be a gift for a 1 year old boy next weekend, but it is sooo hot right now, I really think my beanie will be an inappropriate gift! I will just have to make something else that is more summerish! Inspiration for this beanie came from googling images of 'crochet gift for one year old boy' then 'crochet monster hat', none were quite like mine.

Using some more of the sea green I have left from the Wangaratte Mill, I started by making a beanie. I fitted it to my 1 year old son's head, to make sure it would fit, using a 4mm hook. The first 6 rows are increasing, the very first round had 16 dc. The 2nd round increasing every 2nd stitch, so it's 2 dc 1 dc repeated *, which makes 24 stitches in the round. The 3rd round increases 2 dc 1  dc 1 dc, repeated, the 4th round increases 2 dc 1 dc 1 dc 1 dc, repeated, the 5th round increases 2 dc 1 dc 1 dc 1 dc 1 dc. After that, each row just has the same dc as the previous row. To make a beanie for a larger head, you increase the number of increasing rows, to make a smaller beanie you decrease the number of increasing rows. I make rows until the beanie covered my son's ears. You can make it slightly shorter, or longer if you want a turned up edge. I hope that makes sense to you, because it makes sense to me!

To make the beanie look like a monster I decorated it with two eyes and 4 sharp white teeth! The pattern for the teeth is 1 ch, 2 dc 1 ch 2 dc, 1 sc, 1 sl st, (1 sc, 2 dc 1 ch 2 dc, 1 sc, 1 sl st) x 3, for 4 teeth. Pull and pinch the ch at the tips slightly to make the teeth appear pointed.  For the eyes, I made 2 flat circles in white. 1st round has 12 dc, the 2nd round has 24 as it increases 2 in every st. Then I made 2 smaller black circles, using finer black wool, I threaded the ends onto a needle to sew the eyes together and onto the beanie at the same time. To finish, I edged the eyes with varigated yarn, also from the Wangaratta Mill, to attach the eyes more securely. I think the multi-coloured edge to the eyes makes the monster more friendly looking, as does the wonky tilt to his eyes!

I'm not sure what will happen to this beanie, I might give it away, or use it as a beanie for my son this coming winter. This was so easy to make, if my friends wanted some I'm sure I could whip up some more. I like making these as the colour choice is pretty open ended, which means I can use up some of this yarn that is piling up here!

* my apologies to my fellow Australians who read UK crochet, as this is in US crochet. To convert into UK crochet sc = dc, dc = tr crochet

Saturday, January 7, 2012

Large Purple Granny Rug

I finally finished this rug yesterday morning, after I first bought this yarn in July 2009! So that's 2 and a half years from start to finish, a very long term project indeed!

For this I used my 5mm hook, a bigger hook makes the rug go faster and for this one it needed all the help it could get. This is the largest rug I've done and it doesn't even cover my queen sized bed! It's only slightly larger than my other 'therapy rug'. I don't think I'll be doing many of these, they are kinda boring. I just did a bit when watching TV. I find smaller projects that finish quicker much more satisfying. Also, considering there is almost $20 worth of acrylic yarn in this rug I'm thinking it's not really worth it. You can pick up a nice cotton blanket for less and it's larger, you can also get polar fleece blankets for less and I think they're warmer. So, not many more of these rugs from me! The pattern is a simple granny square, with 3 rows of dc at the end. The corner has an extra 7 dc in it.

I'm not sure where this rug is going, maybe on the single guest bed as it's too small for the big bed. I'm just so glad it's finished!

Friday, January 6, 2012

Freiya's Flower Handbag

Today is the second 1st birthday in our mother's group so we have a party to go to, it's very exciting! I made this small striped bag with a flower as a gift, I hope she likes it!
small drawstring bag with flower
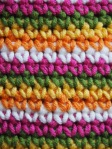
I used 5 colours from my batch of cotton blend, it's a thick yarn so I used my 4mm hook. It's a simple bag, changing colours every row of sc using orange, yellow, green, purple and white. I didn't follow a pattern for the flower either, just did a couple of rounds in yellow ending up with 16 sc, then changed to orange and did 8 petals. Each petals started as 3 ch in every 2nd sc, then the second row is 5 sc into the sp with a sl st to start a new petal.
detail of coloured stripes on the handbag
I used fine cotton and needle to do a simple running stitch to attach the flower to the front. For the bag, a sc ch lip for a ch handle to be threaded through, and a larger ch handle with a second row of sc in orange. The one thing I'm unhappy with is this cotton is too thick to thread through my needle so I couldn't finish off the ends very neatly. Instead I have to weave them in with my crochet hook which means the ends can poke through easily. Eventually there will be some loose ends visible in this bag which will make it look a little rough. Hopefully that will add to the home made character of it!
cupcake birthday card made by my mum
To go with this gift my mum made a special home made birthday card, which is very nice! I'll also include a small Fisher-Price little people car inside the bag, and of course a book which I always love to give children! Children can never have too many books!
the one of a kind detail on the back of the card

Sunday, January 1, 2012

A Christmas Eve Tea Cosy

This is my first attempt at a tea cosy, and considering I didn't have the tea pot with me at the time to fit to measure as I went,  it turned out damned well!

It was pretty damn lucky this thing fit, but I did use a stitch that has a lot of stretch in it so it had a chance. I chose some nice soft acrylic my mum had spare and started with two rectangles of alternating rows of ridges. In hind sight, the ridges should have gone vertically instead of horizontally for even more stretch. This would increase the chance of the cosy being used for different tea pots. I chose the cheery and bright yellow colour, not only because it felt soft and would be nice to work with, but because it is a sunshiney happy colour for good luck, perfect for a family kitchen.

I was staring at the two rectangles wondering how to fix it all up as there were several options. In the end I opted to do a quick job with minimal fuss, with 1 dc 1 ch along the top for the ch pull handle. Next time this should only be 1 sc 1 ch to reduce heat loss. If I wanted to do a really good job, I could do two layers and sew them together with a 1 sc 1 dc lip, or maybe that would need the 1 dc 1ch lip, because it will be that much thicker. Also, there should be another row of dc above the lip, to further reduce heat loss. All good to note for the future, in case any one else wants me to make them a tea cosy.

I whipped up this tea cosy on Christmas Eve while everyone else slept and I couldn't. It took me just under two hours, and I used either my 3.5mm or 4mm hook. On Christmas day I did a free form patch on my brother's damaged beanie, I just used some blue that was on hand, it doesn't match very well but I'm sure it doesn't matter as this beanie is bound to end up in the bin. It was very tricky, especially as I've never done it before, but because I am so clever I did an absolutely awesome job!! I can not for the life of me imagine why anyone would think it was ok to take to an especially made custom crochet beanie with a pair of scissors to rig up a tea cosy, but truth is stranger than fiction it seems. Thanks for taking some time to read my blog.

Friday, December 23, 2011

Simple Gifts - girl's handbag, soap savers, dishcloths

 I made these things to give as gifts this Christmas, finishing the dishcloths today.

My sister told me her daughter would like a grey and pink bag like the one I gave her last year, but this time with a zig zag or polkadot pattern. So this is what I came up with! It's my own pattern and required a second attempt, the first one was just to work it out, then it got unravelled! The pattern is basically a sl st, sc, hdc, 3 dc, hdc, sc, sl st repeated, every second row does the same pattern but inverted with the sl st falling on the middle dc, if you know what I mean! Two rows one colour then the next two rows the other colour result in these wavy stripes. Otherwise, it's a pretty straight forward bag, with a row of dc in the handle. I think I used a 4mm hook, I really like the pink I used its a vibrant colour, and some dark grey wool.

My favourite soap is the pink Dove soap, its a pink ribbon fund raiser and is very nice, soft and creamy. I decided to use some pretty pink cotton I have left over from the sun hat I made for my niece last year, to make some pretty soap savers! Again, I had to have a second attempt, the first go I worked out the pattern then had to unravel it and start again properly. I started at the bottom with 9 ch, then a dc in every ch, 3 extra at each end, then another 9 on the other side of the ch to make a round. After that there are 7 rows of lace, the pattern is 2 dc 1 ch 2 dc, sk 2, 1 dc 3 ch 1 dc, sk 2, then alternated into the sp, if you know what I mean! Then the top is 1 dc 1 ch, and a ch threaded through and sl st onto itself to make a closed tie handle. I used a 3.5mm hook and a 50/50 cotton and acrylic blend. I hope the recipents like these, I think they're really nice anyway!


Today I finished these pentagon dishcloths using up the last of the pretty 50/50 cotton acrylic blend. It's so sad to see the last of it go! Again I used the 3.5mm hook, and my own pattern. This is like other pentagon dishcloths I've made, but slightly bigger as my husband has said they need to be! If I didn't run out of cotton they would be even bigger! I've made these for people who mentioned they'd like home-made dishcloths, I hope they like these!

Merry Christmas!!!
<3

Wednesday, December 14, 2011

Five dollar limit on gifts a Great Idea!

There are so many cute little gift ideas under $5, especially for babies and young children, there's no need for the gift giving ritual to be excessively expensive!

Our living Christmas tree enjoys it's second festive season
Now I'm a mum I'm making more of an effort with Christmas this year. Granted I could make more of an effort than I have, but this year I'm just warming up! Next year I'll be even more organised! Today I brought in our living Christmas tree and decorated it, it does look a little small, scrawny and sad, but not as much as last year! And next year, if all goes well, the Christmas tree should look better and bigger after a year of growth. I couldn't put much decoration on it at all, it started to lean over so much, so I could only put one small star on it, and the love heart garland I made last year.

All the gifts I'm giving this year, or should I say Thomas is giving this year, cost $5 or less. As much as I'm actually not that keen on Christmas, I don't want to be the mean spirited parent who makes my son miss out on something that is an undeniably big part of our culture. So Thomas is giving everyone a small gift this year, especially considering all the generous gifts he got from them when he was born! But I do wish others were not so extravagant with their gifts, because we can't afford to reciprocate. But there are so many cute things you can give for just $5 or less! Some ideas for this year include books and a toy car I found on special for the kids, gluten free chocolate biscuits for my coeliac brother and framed photos of Thomas for the grandparents. I prefer to buy children's books second hand from the charity stores, as they usually only cost 50c. Sometimes I can pay $2 for a second hand book, which is still a lot cheaper than most new ones, but I found some nice ones for $4 at the department store.

Its not hard, and when Thomas is older I hope to teach him some graciousness when it comes to gift giving, even if his mum is clearly lacking in that department!

Thursday, December 8, 2011

Homemade Gift Tag for a Young Child

I love this home-made gift tag made by our friend Lyndal for this year's Secret Santa!

Isn't technology great? To make this simple gift tag, perfect for a young child, all you need is a colour printer and access to the internet. Lyndal found a picture of Thomas on my facebook page, and printed it up along with a picture of her daughter, Isabella. And I just love the cheeky grin in this photo, when Thomas has chocolate custard smeared all over his face! This kind of gift tag is perfect for young children who are learning to read.

Thanks for this wonderful idea Lyndal, I think I might just have to use it myself this Christmas!

Tuesday, December 6, 2011

Two Barbie dolls from my childhood, Beauty Secrets 1979 and the 1975 Ballerina.

Beauty Secrets 1979 & Ballerina 1975
So how did all this Barbie doll collecting start? I must say, I'm not quite sure, other than to pin point it down to the moment I saw a picture of a doll from my childhood on the page of a Facebook friend. I recognised her immediately, and asked my fellow Barbie fan what she was called. She replied she was a Beauty Secrets Barbie from 1979, so knowing what she was called I then did a search on ebay, and I found her! This is the doll I had kept until my early 30s, and in good condition too, but sadly lost while moving around after my divorce.

Beauty Secrets before restoration
The asking price for a mint in box starts from $100! But I wanted to see and touch her, so one still in the box was out of the question. I did bid on one that went for $15, but her hair looked terrible so I stopped bidding and someone else got her. Then I saw these two dolls in an auction for 8 dolls, the seller did not know what any of them were, other than to say some were Barbie dolls. I recognised the ballerina as also being from my childhood, and decided I needed to win the auction! I bid far too much, plus postage it cost me over $51! But now I have these beautiful dolls, and because they started it all off, I'm thinking I'm not sure I want to sell these two. As guilty as I feel for wasting money on such a silly thing, they were the reason why I spent the money, so maybe I should keep them afterall?!

When the dolls arrived in the mail, I was horrified. Their hair was terrible, they were very grubby and had a very strong 'old' smell. There were only 3 Barbie dolls, not 4 like the seller stated, and one Ken doll, and I didn't know what the others were. I have since identified them all, which has been a very satisfying experience! It's been a bit of a thrill to discover the proper name for each doll. I'll hopefully find time to blog about the other dolls soon. But I've started with these two, as I knew from the start who they were.

Ballerina before restoration
I practised cleaning hair on some other dolls before cleaning these two. The Beauty Secrets doll's hair was stiff and hard, like it had been ruined with some substance, I was sure it could not be saved. The Ballerina's joints were limp and she sits delicately in your hand, her limbs are still attached but do not hold. Both their faces were incredibly grubby and dirty, I wasn't sure I could clean them. But I used a toothbrush and some baby shampoo and gently scrubbed their faces and they came up very nicely. I rinsed the Beauty Secret's hair and the stuff came out as if it were aged hair conditioner, and her hair came up soft. The Ballerina's hair is frizzed, perhaps as if someone has used a hair dryer on it, so I couldn't do anything with it and now have it tied back with a band, inside the snood I made a while ago. I think I'll practice on some other dolls before I try an intensive conditioning treatment on her hair. To wash their hair I first used hair conditioner, then shampoo, then carefully combed out the knots holding the hair firmly at the scalp, then more conditioner and left it in for a few hours, then rinsed thoroughly. On the hair of these dolls I didn't put any baby oil like I might on younger dolls.

and with their new accessories
I washed the clothes, and because I don't have the Ballerina tutu, I put her in a gown that came with these dolls, but was worn by another Barbie. My guess was it was a 'proper' Barbie dress, and my hunch turned out to be right! Its the dress worn by the Happy Birthday Barbie from 1980! A very fitting dress for my 1975 Ballerina with a missing tutu, I think! Because these dolls are special to me, I put some genuine Mattel Fashionista shoes on them, the Beauty Secrets even has some extra Fashionista accessories I had spare, too! I had to really squeeze the feet into the pink shoes, which is not a good idea as this could damage the feet. I've heard serious doll collectors remove the clothes and shoes for storage, to minimise damage over time. There is already some metal poking through the soft plastic of her legs, which can not be fixed and will continue to deteriorate. Inside the purple makeup case that came with the doll in 1979, are a hairbrush, comb, mirror and compact I found in the other auction I bought. I'll write more on that ebay buy another day ...

Thursday, December 1, 2011

My Early Ebay Adventures

There's so much I'm doing at the moment that I'd like to blog about, but time is so precious right now, it's been a matter of choosing between the doing or writing about the doing, so the doing has been winning out!

When Thomas was still in the hospital nursery, David and I decided we needed a new mattress on our bed, as my old one was starting to feel uncomfortable. Looking back, I don't know why we didn't take the delivery guys offer to remove the old mattress! Why did I think I still needed the old one? We had no room for it, so for the next 10 months, it stood up on it's side in our spare room which cast a very gloomy atmosphere over it, and it couldn't have been doing the mattress any good leaning up against the wall like that. I couldn't think what to do with it, as most charities say they don't like to accept donations of mattresses, so would they come and pick one up? Like most things around our small rented 3 bedroom town house, our possessions seemed to be taking over, crowding me in. I just didn't know what to do with all this extra stuff we had accumulated over the last 4 years. Then it finally occurred to me that I could try and sell the mattress on ebay.

I had bought a couple of things from ebay in May 2010, including a beautiful cane doll's furniture set that has featured on my blog before. But I had never sold anything. My overwhelming feeling was that I was too afraid to sell something in case the buyer would be unhappy, I imagined them harassing me for their money back, which would make me feel terrible! This was yet another avoiding behaviour of mine, while living like a hermit for 3 years, hiding from the world. But ever since David and I decided to start a family in early 2010 I've been getting braver, so I've been changing the way I live my life, the benefit of my child being the main motivator. So I had a go, and listed the queen size mattress on ebay!

I started bidding at $0.99 thinking I really just needed someone to come and pick it up. Oh, please won't someone come and take our old mattress away? And sure enough, bidding started that night, and by the end the auction closed at $10.50! More than I expected, that's for sure. And the sale went just fine, the lady came and pressed the money into my hand and took the mattress away in the back of her station wagon. We were worried that she didn't have enough room, she had 2 teenagers with her, and one had to crouch down below the mattress in the back seat! And then later that night, I had some positive feedback! I was on my way to becoming an ebay seller!

Since then I've sold David's old fish tank, which sold at an amazing $52 from a starting bid of 99c, a near new blender for $16.50, a wok for $5.50 and a plastic cheese grater for $3! Its surprising when these people came to pick up their items that most were under prepared. The fish tank ended up being put on her sons lap! But I've also made a couple of reckless purchases which I now regret and promise to be more careful of in future! I got it into my head that I wanted to buy a doll that I had from my childhood that I had lost. I saw a picture of her on facebook, and now I knew what her name was so I could find her for sale, she was a Beauty Secrets Barbie from 1979. I saw a listing for a group of 8 dolls, most I didn't recognise, but there she was, as well as the Ballerina Barbie from 1975, which I also had as a little girl. So I bought it, and after postage, it cost me $51.56! /gasp! But it gets worse, I also bought some doll furniture which I recognised, which included some dolls clothes, for about $55! So feeling guilty, I now need to clean it all up and sell it, to try and get my money back for making such frivolous buys! Oh, ebay how yee tempts thee!! I hope to find more time soon to blog about what I'm doing with these vintage dolls and clothes from the 1970s, and the journey I had learning to identify them!

My goal at the moment is to get rid of possessions we no longer need or use, which in this place we just don't have the room for. I've now learned its far better to offload these things sooner, rather than to keep carting them around from place to place for years just in case we might need them one day. I can finally see a light at the end of the tunnel that was an incredibly disorganised and cramped house. Now I dream of a streamlined, Spartan home that is easy to clean, and most importantly, easy to move when the time inevitably comes to do so.
Related Posts Plugin for WordPress, Blogger...